Speed Up Chrome with RAMDisk
Chrome writes a large amount of cache data to disk. Moving that cache to a RAM disk can reduce storage access delays, speed up tab switching, and make browsing feel more responsive on systems with spare memory.
This guide keeps the original idea intact: create a RAM disk, preserve the image between reboots, and point Chrome's disk cache to the new memory-backed drive.
Why a RAMDisk Can Help Chrome
Browsers save a lot of data to the hard drive. Cached images, page resources, and temporary data are repeatedly loaded when you revisit sites or reopen tabs. Even on modern machines, this can create the familiar grind of waiting for a tab to reload from storage.
Many Windows PCs have unused RAM during normal browsing. A RAM disk lets you use part of that memory as ultra-fast temporary storage. When Chrome cache lives there, browser startup, tab switching, and some page load operations can feel noticeably faster.
Before You Start
- Make sure your PC has enough spare RAM for a RAM disk.
- Close Chrome before changing cache settings.
- Decide which drive letter your RAM disk will use, such as
E:.
How to Speed Up Chrome with RAMDisk
Step 1: Install GiliSoft RAMDisk
Download and install GiliSoft RAMDisk first. This is the tool that creates the memory-backed drive you will use for browser cache.
Step 2: Create and Configure the RAMDisk
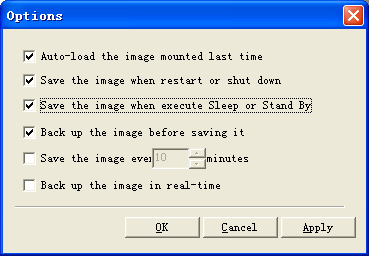
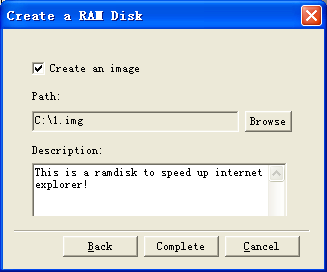
Open GiliSoft RAMDisk and create the RAM drive that will hold your Chrome cache. The original recommendation on this page is still sensible: configure the RAM disk so its image can be restored and saved between sessions.
- Click the Options button.
- Enable image load/save options for restart, shutdown, sleep, or standby as needed.
- Select a file path where the RAM disk image will be stored.
- Complete the wizard and let the tool create the new RAM disk.

Step 3: Move Chrome Cache to the RAM Drive
Once the RAM disk is ready, point Chrome's cache directory to the
new drive. The original page used a folder like
E:\BrowserCache, and that remains a clear example.
- Create a folder on the RAM drive, such as
E:\BrowserCache. - Close all Chrome windows and tabs.
- Right-click the Chrome shortcut you normally use and open Properties.
- Move the cursor to the end of the target path, after
chrome.exe. - Add
--disk-cache-dir="E:\BrowserCache"and save the shortcut. - Launch Chrome from that shortcut.
E: with
the correct drive letter. Avoid adding a trailing slash.
What This Guide Helps You Achieve
- Reduce repeated cache reads from slower storage.
- Make Chrome feel more responsive when switching between tabs.
- Keep browser cache in temporary high-speed memory.
- Use spare RAM to improve day-to-day browser workflow.