Q 1: How to install GiliSoft Audio Toolbox?
Q 2: How do I us the recorder?
Q 3: How do I cut audio files?
Q 4: How do I join audio files?
Q 5: How do I convert audio files?
Q 6: How do I convert video to audio/mp3 file?
Q 7: How do I edit the ID3 tags of an audio file?
Q 8: How do I transfer audio files to iTunes?
Q 9: How do I use the CD Ripper to rip a CD/DVD?
Q 10: How do I use the CD Burner to burn a CD/DVD?
Q 1: How to install GiliSoft Audio Toolbox?
Step 1: You can easily download Gilisoft Audio Toolbox by clicking the button below.
Step 2: After downloading the setup file, run it on your computer. Then follow through the installation process to complete it.
Q 2: How do I use the recorder?
To record sound from your microphone –
Step 1: Launch the program and click on the “Recorder” option.
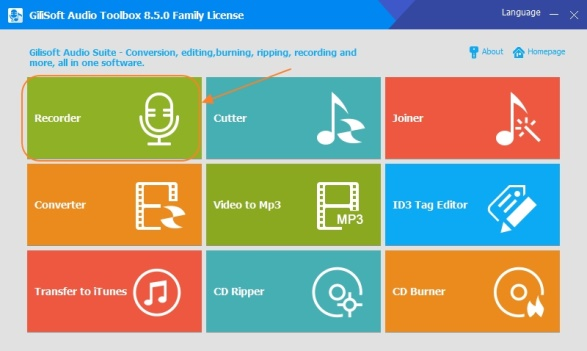
Image name: use-recorder-option
Alt: use recorder option
Step 2: You’ll get an interface like below. Select “Microphone” option. You can test your microphone from here if you want, before you finally start recording. You can choose your output format for the recorded file from the “Output Format” option. If you want to tweak the recording and access more options, click on the “Settings” button.
You can edit the Audio file settings, Voice activation system, Effects, File length limitation, Hotkeys etc. settings from there. Then click on “Okay” once you have updated your desired settings.
Now select the output folder from the “Output Directory” option.
Step 3: Finally click on the “Record” button to start recording.
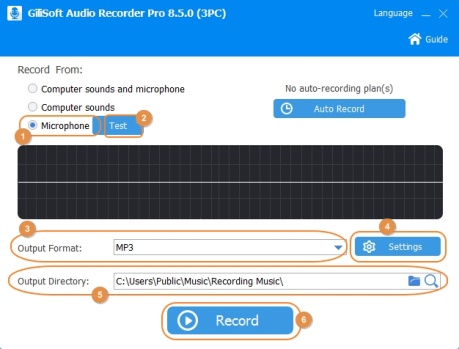
Image name: select-microphone-option
Alt: select microphone option
To record sound computer sounds –
Step 1: Launch the program and click on the “Recorder” option.

Image name: use-recorder-option
Alt: use recorder option
Step 2: You’ll get an interface like below. Now select “Computer sounds” option. You can test your computer sounds from here if you want, before you finally start recording. You can choose your output format for the recorded file from the “Output Format” option. If you want to tweak the recording and access more options, click on the “Settings” button.
You can edit the Audio file settings, Voice activation system, Effects, File length limitation, Hotkeys etc. settings from there. Then click on “Okay” once you have updated your desired settings.
Now select the output folder from the “Output Directory” option.
Step 3: Finally click on the “Record” button to start recording.
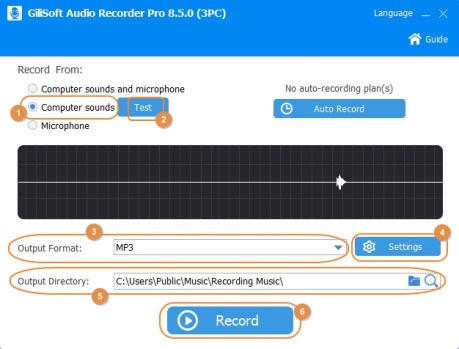
Image name: select-computer-sounds-option
Alt: select computer sounds option
To record microphone and computer both sounds –
Step 1: Launch the program and click on the “Recorder” option.

Image name: use-recorder-option
Alt: use recorder option
Step 2: You’ll get an interface like below. Now select “Computer sounds and microphone” option. You can test your sounds from here if you want, before you finally start recording. You can choose your output format for the recorded file from the “Output Format” option. If you want to tweak the recording and access more options, click on the “Settings” button.
You can edit the Audio file settings, Voice activation system, Effects, File length limitation, Hotkeys etc. settings from there. Then click on “Okay” once you have updated your desired settings.
Now select the output folder from the “Output Directory” option.
Step 3: Finally click on the “Record” button to start recording.
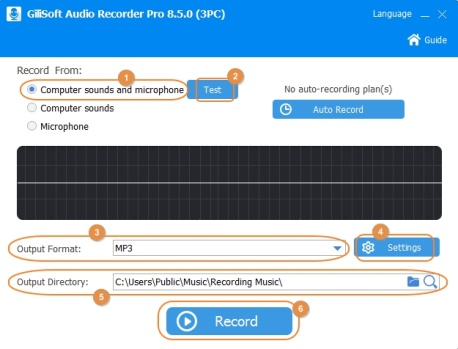
Image name: select-computer-and-microphone-both-sounds-option
Alt: select computer and microphone both sounds option
Q 3: How do I cut audio files or use audio cutter option?
Step 1: Launch the program and click on the “Cutter” option.

Image name: use-cutter-option
Alt: use cutter option
Step 2: Now click on the “Add Files” button to add files into the system. After the audio file is imported into the system, click on the “Cut” button to proceed into audio cutter function.
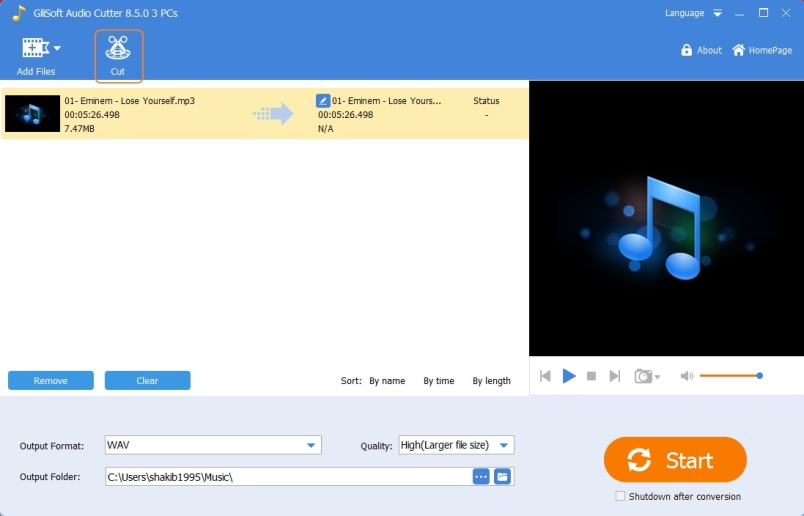
Image name: select-cut
Alt: select cut
Step 3: You’ll get a new window where the audio file will load in. Here you can use the slider to set the start and ending position of the audio that you want to keep according to your choice. You can also use the “Start” and “End” option to set the time of starting and ending. You can use the “Fade in” and “Fade out” option to add fading in and out effects into your audio. There is “Adjust Speed” option to adjust the audio speed, “Change of voice” option to add voice effects into the audio, “Adjust Volume” option to adjust the volume of your audio. You can easily listen to the audio file to check how it is, when you are cutting and editing it.
Finally when you are done, click on “Apply” and then click “OK” button.
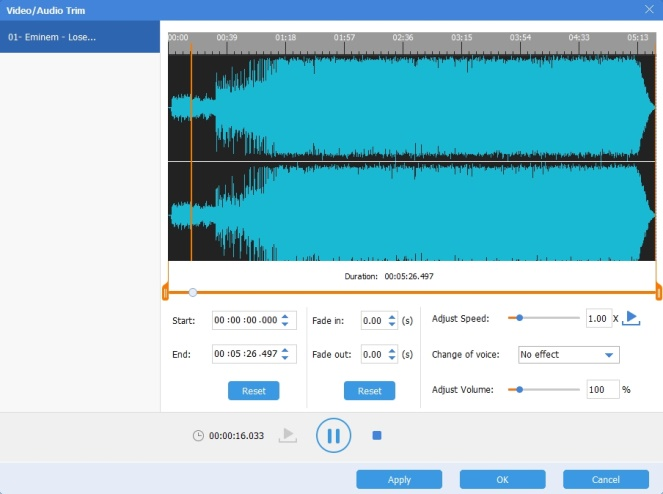
Image name: audio-cutter-interface
Alt: audio cutter interface
Step 4: Next, you’ll get into the final interface. Here you can easily use the “Output Format” and “Output Folder” option to choose the output format of your audio file and the output folder to save it. You can also set the audio quality by using the “Quality” option.
Finally, click on the “Start” button to proceed.

Image name: cut-audio-files
Alt: cut audio files
Q 4: How do I join audio files?
Step 1: Launch the program and click on the “Joiner” option.

Image name: use-joiner-option
Alt: use joiner option
Step 2: Click on the “Add Files” button and import the audio files that you want to join together.
Step 3: Make sure you tick the mark of “Merge all files into one” option. Set the “Output Format”, “Output Folder” and audio “Quality.
Then click on the “Start” button to join the audio files into one single file.
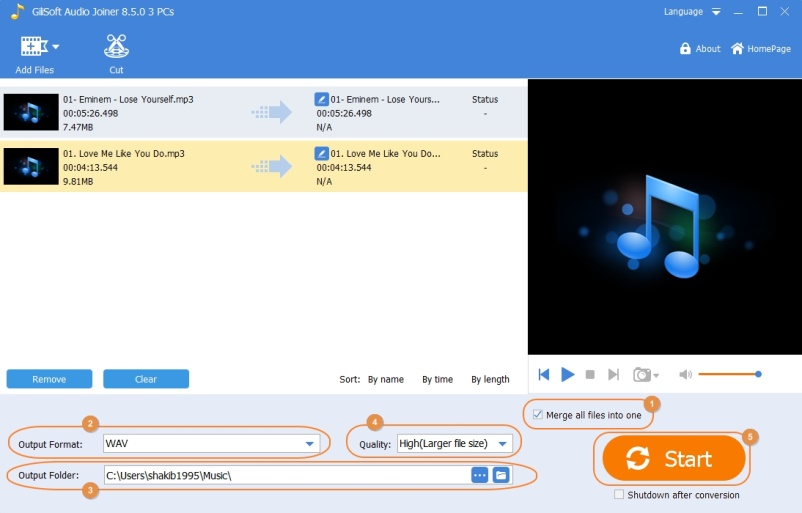
Image name: join-audio-files
Alt: join audio files
Q 5: How do I convert audio files?
Step 1: Launch the program and click on the “Converter” option.

Image name: use-converter-option
Alt: use converter option
Step 2: On the converting interface, click on “Add Files” to import audio files. Then simply select your desired “Output Format”, select the “Output Folder”, and choose audio “Quality”.
Finally click on the “Start” button to convert the file/files.
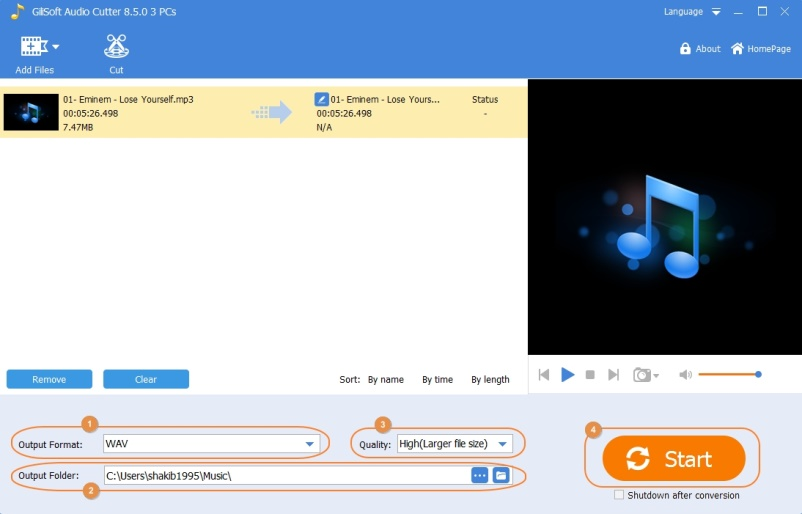
Image name: convert-audio-files
Alt: convert audio files
Q 6: How do I convert video to audio/mp3 file?
Step 1: Launch the program and click on the “Video to MP3” option.

Image name: use-video-to-mp3-option
Alt: use video to mp3 option
Step 2: Now click on the “Add Files” button to import the video file into the program. Then you can easily select the “Output Format”, set the “Output Folder”, and choose audio “Quality”.
Finally click on the “Start” button to convert the video file into your desired audio file format.
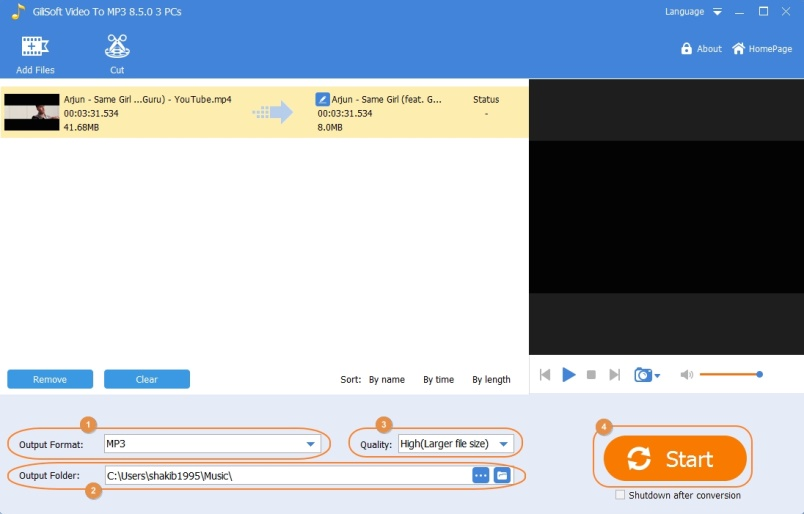
Image name: convert-video-to-mp3
Alt: convert video to mp3
Q 7: How do I edit the ID3 tags of an audio file?
Step 1: Launch the program and click on the “ID3 Tag Editor” option.

Image name: use-id3-tag-editor-option
Alt: use id3 tag editor option
Step 2: You’ll get an interface like below where all the tags will be empty at first. Click on the “Load” button to import the audio file which you want to edit the id3 tags for. When the file loads, you can easily edit/remove/add the Title, Artist, Album, Year, Genre and Album Picture of that file.
Finally click on the “Save” button to save the changes you made.
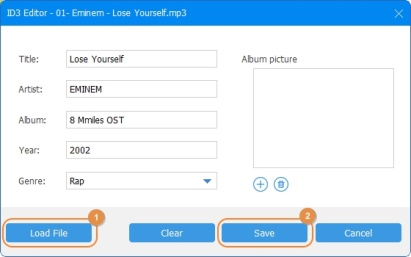
Image name: edit-id3-tags-on-file
Alt: edit id3 tags on file
Q 8: How do I transfer audio files to iTunes?
Step 1: Launch the program and click on the “Transfer to iTunes” option.
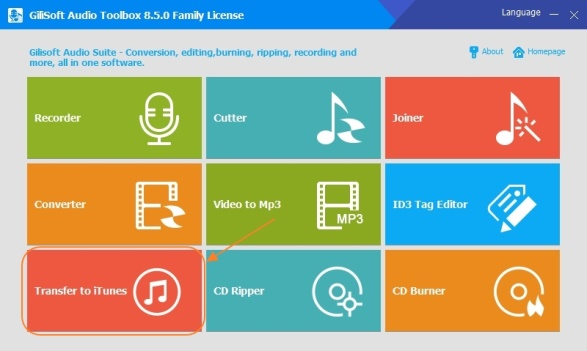
Image name: use-transfer-to-itunes-option
Alt: use transfer to itunes option
Step 2: You’ll get a prompt, where you need to click on “Yes”. Then the transferring window will open which should look exactly like below image. Click on “Add Files” button, and then select the audio files of your choice from the file manager window to import them into the program.

Image name: add-files-to-transfer
Alt: add files to transfer
Step 3: Next you can select the audio files from the list, and use the “Remove” button if you wish to remove any of them. When you have finalized the audio files of your choice and selected them all, simply click on the “Add to iTunes” button and follow through the process to add them into your iTunes.
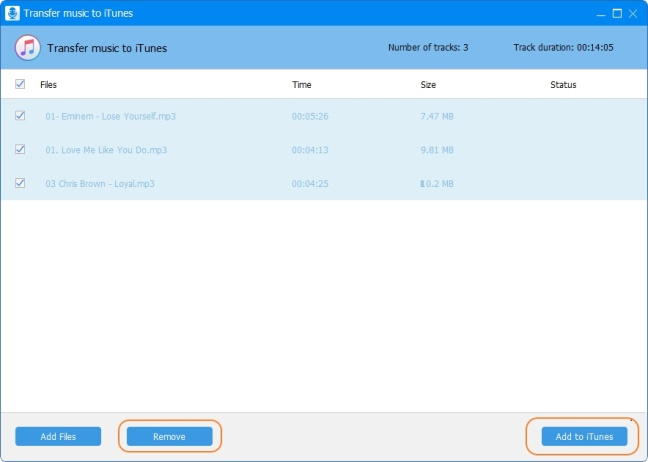
Image name: transfer-audio-to-itunes
Alt: transfer audio to itunes
Q 9: How do I use the CD Ripper to rip a CD/DVD?
Step 1: Launch the program and click on the “CD Ripper” option.

Image name: use-cd-ripper-option
Alt: use cd ripper option
Step 2: Click on the “Add Files” button and select the CD/DVD drive that you have already inserted into your computer. This will import all the audio files available in the CD/DVD drive.
Step 3: Then you can simply select the “Output Format”, set the “Output Folder”, and choose the audio “Quality”.
Finally click on the “Start” button to copy all the audio files into the specified folder as your desired file format.
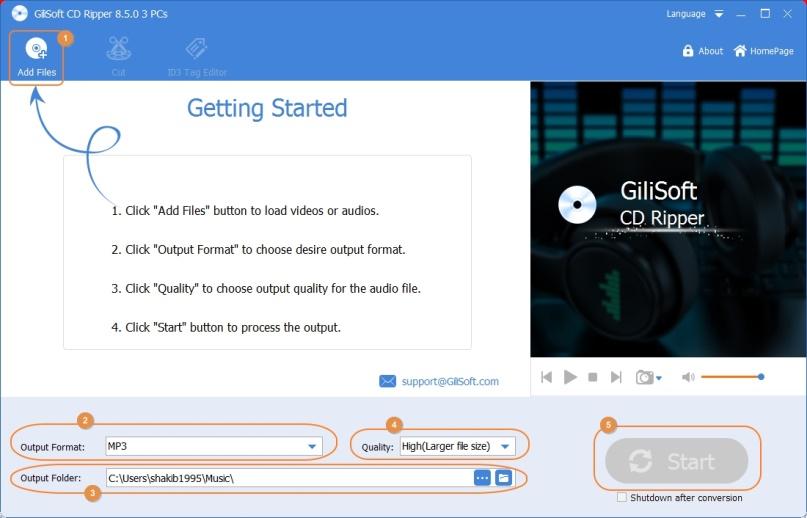
Image name: rip-audio-files-from-cd
Alt: rip audio files from cd
Q 10: How do I use the CD Burner to burn a CD/DVD?
Step 1: Launch the program and click on the “CD Burner” option.

Image name: use-cd-burner-option
Alt: use cd burner option
Step 2: Click on the “Add Files” button, then select and import the audio files that you want to burn into an empty CD/DVD drive or image file. This will import all the audio files available in the CD/DVD drive. You should have already inserted a blank CD/DVD drive into your computer for this process if you want to burn the files into it. Or you can simply burn the files into an image file.
Step 3: Then you can simply use the “Profile” option for choosing weather you want to burn this CD/DVD as an “Audio CD” or a “Data CD/DVD”.
Step 4: Now set the “Destination” for burning the files. You can either select an empty CD/DVD drive or simply choose to burn the files into an “APE Image File” or “BIN Image File”.
Step 5: Next you can set the number of “Copies” you want to make and the “Write Speed” of your choice. Finally click on the “Start” button to burn all the files into the specified CD/DVD drive or an image file.

Image name: rip-audio-files-from-cd
Alt: rip audio files from cd