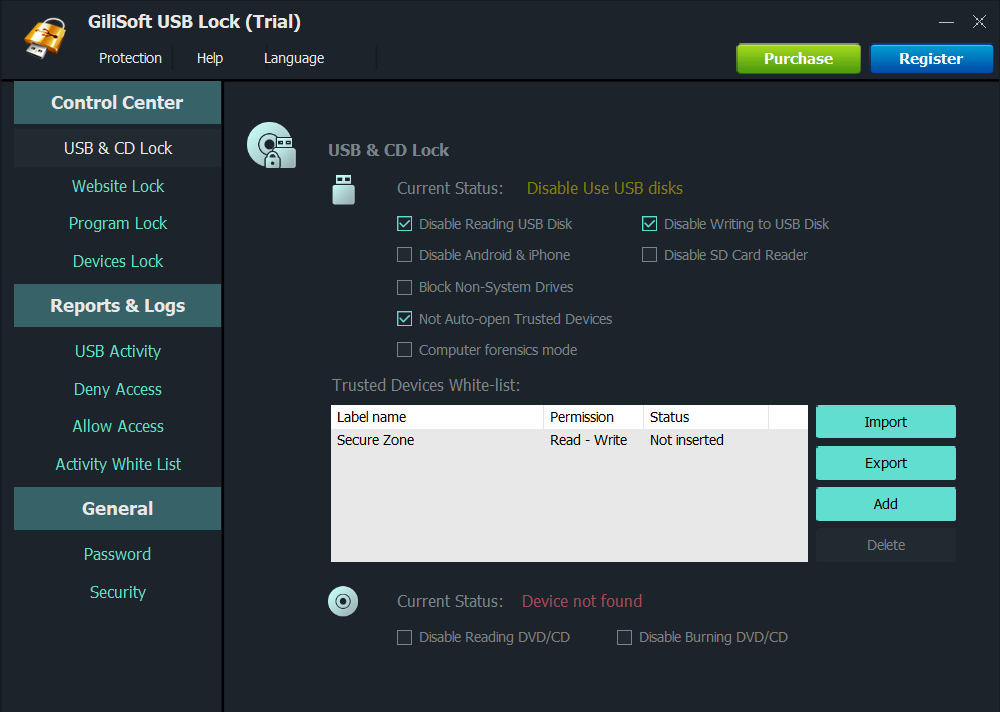
Open USB & CD Lock
Run GiliSoft USB Lock and open the USB & CD Lock area where removable-device rules are managed.
Use this guide to add trusted USB drives to the GiliSoft USB Lock whitelist, export the approved-device list, and import the same whitelist on other Windows PCs.
USB whitelisting is useful when unknown flash drives should stay blocked, but selected company USB drives, training drives, or approved removable disks still need to work. Instead of adding the same trusted devices manually on every computer, GiliSoft USB Lock lets you build a whitelist once, export it, and import it on other machines.
This page is written for readers who already use GiliSoft USB Lock and need a practical reference for USB & CD Lock whitelist deployment.
Run GiliSoft USB Lock and open the USB & CD Lock area where removable-device rules are managed.
Insert an approved USB drive, click Add, and repeat the process for every USB drive that should be allowed.
After all approved USB drives are listed, click Export to save one whitelist file for reuse.
On another Windows PC, open USB Lock and click Import to apply the same trusted-device list.
Open GiliSoft USB Lock on the Windows PC where you want to build the trusted-device list, then go to USB & CD Lock.
Insert one trusted USB drive and click Add. Repeat this step until all approved USB drives are included in the whitelist.
Click Export to save the whitelist file after the approved USB device list is complete.
Move the whitelist file to another machine, open USB Lock there, and click Import to apply the same approved-device list.
The whitelist lets approved USB devices remain usable without opening the PC to every personal flash drive or removable disk.
Export and import are helpful when many office, lab, or shared PCs should use the same trusted-device list.
Build the list once, verify it, then reuse the exported whitelist instead of adding every approved device again on each machine.
This process controls which USB devices can be used on a PC. If the files on the drive itself need password protection, see USB Encryption.
Use a name that identifies the department, location, or device group so future administrators know what the list contains.
Store the exported whitelist in a controlled admin folder so it can be reused if a PC is reinstalled or replaced.
After importing, test one approved USB drive and one unapproved USB drive to confirm the policy behaves as expected.
If a trusted USB drive is replaced, add the new drive, export a fresh whitelist, and redeploy it to the required machines.
A USB whitelist allows approved USB drives to work while unknown or unapproved USB storage devices remain blocked by policy.
Yes. Insert each approved drive and click Add. Repeat until the whitelist contains all trusted USB drives you want to allow.
Exporting saves the approved-device list so it can be reused, backed up, or deployed to other Windows PCs.
No. Whitelisting controls which USB devices can be used on a PC. USB Encryption protects the files stored on the USB drive itself.
Build a whitelist for approved USB drives, export it, and import the same list on other Windows PCs that need consistent removable-device control.
Buy USB Lock