
How to Clear Browsing History on Windows
Browsing history is not one list. A browser can keep visited addresses, downloads, cookies, cached files, form entries, permissions, and synchronized activity in different places. Clear the right categories and verify whether the account is syncing before calling the cleanup complete.
Quick answer
In each browser, open its privacy or history settings, choose the required time range, and select only the data types you intend to remove. If sync is enabled, decide whether the change should apply to this device or every synced device. GiliSoft Privacy Protector can then review supported local browser and Windows traces, but it cannot erase records held by websites, employers, network operators, backups, or other devices.
Choose What Browsing Data to Clear
| Situation | Recommended approach | Check carefully |
|---|---|---|
| Visited page list | Clear browsing history for the intended time range | Local history and synced account history may be separate |
| Cookies and site data | Remove only when sign-outs and lost site preferences are acceptable | Clearing cookies does not delete accounts at the websites |
| Cached images and files | Clear when privacy or troubleshooting justifies it | The first reload may be slower |
| Download history | Clear the list, then inspect the Downloads folder separately | Removing the list does not delete downloaded files |
Step-by-Step Workflow
- Check browser profiles and sync
Identify every browser profile in use. If the profile syncs, decide whether you want to clear only this computer or the account data shared with other devices.
- Use the browser cleanup controls first
Open the browser privacy settings, choose a time range, and select history, cache, cookies, downloads, form data, or saved passwords deliberately instead of checking everything by habit.
- Inspect downloaded and exported files
Open the Downloads folder and any custom save locations. Delete only files you no longer need, then empty the Recycle Bin if ordinary deletion is sufficient.
- Review local traces in Privacy Protector
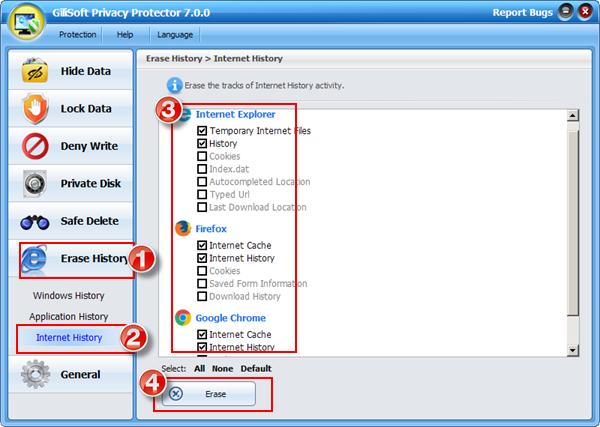
Open the supported browser-history and Windows-history areas in GiliSoft Privacy Protector, review the detected categories, and clean only the selected records.
- Verify the result
Restart the browser, inspect its history page and recent download list, then check another synced device or the account privacy dashboard when relevant.
For every product control and supported cleanup category, see the Privacy Protector user guide.
GiliSoft Privacy Protector Interface
These real product screenshots connect the guidance to the local Windows workflow.

Review Before You Finish
- Sign out of browsers, cloud services, and work accounts when the computer will change hands.
- Check synchronized devices and cloud dashboards separately; deleting a local record may not delete its cloud copy.
- Keep a verified backup of anything you may need before clearing history or shredding selected files.
- Test the result from a standard user account and restart the PC when the workflow calls for it.
Frequently Asked Questions
Does clearing download history delete downloaded files?
No. It normally removes the browser list, not the files already saved to disk. Inspect the Downloads folder separately.
Should I clear saved passwords too?
Only when that is intentional and you have another safe way to recover required credentials. Password deletion is not needed for every history cleanup.
Why does history return after I clear it?
A signed-in browser may synchronize activity from another device or account store. Check profile and sync settings before clearing again.
Does InPrivate or Incognito mode remove every trace?
No. It limits some local browser records after the session, but downloads, bookmarks, network records, account activity, and external logging may remain.