Choose the music-disc task you need: make an Audio CD, prepare an MP3/WMA disc, trim or mix a track, save BIN/APE output, or check playback. Use the four-step tutorial for a first disc and the individual tasks for specific settings.
Review Output Folder and test the file with supporting software.
Choose a Disc Type and Add Tracks
Intended result
Choose and check
Music for a traditional CD player
Audio CD, with compatible writable CD media. Check the total playing time.
A longer MP3 or WMA collection
Data CD/DVD, using files the player can decode. Check file-size capacity, supported media, folders, and encoding.
Music stored on a DVD
Data CD/DVD with DVD media and a player that supports both the disc and the audio files. This is not a DVD-Video movie.
An Audio CD result saved on the PC
Audio CD, then a BIN or APE file destination. See image-file output instead of selecting a recorder.
Make Your First Music Disc
Follow these four steps for a complete music disc. For a particular adjustment, use the matching task above.
1Choose Audio CD or Data CD/DVD
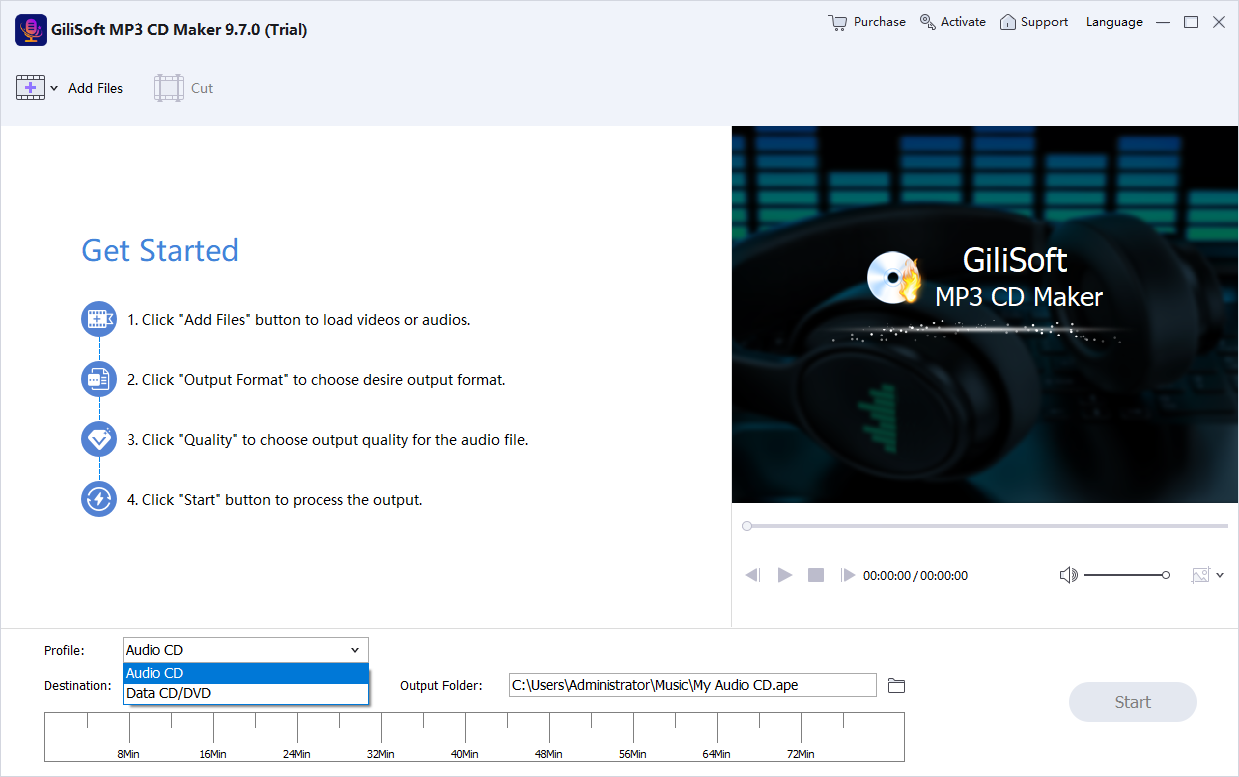
Open GiliSoft MP3 CD Maker and choose a Profile that matches the destination player. Select Audio CD for a traditional music CD, or Data CD/DVD for MP3 or WMA files on a player that supports those formats.
The Profile menu offers Audio CD and Data CD/DVD. Choose by the destination player, not by the source file's extension.
Select Add Files to load your music or a supported video soundtrack. Arrange the list, remove unwanted entries, and use Cut to trim or adjust a track before checking the total disc capacity.
Insert a compatible blank disc and select its writable drive in Destination. Check the profile, source list, and capacity again so the job writes to the physical disc rather than an image file.
Select Start and wait for writing to finish before removing the disc. Play the first, middle, and final tracks on the car stereo, home player, or other device the disc was made for.
Choose the disc for the player you actually plan to use, and confirm that the computer has a writable drive.
Check the destination player
Confirm whether it accepts standard Audio CD, MP3 or WMA data discs, and the chosen CD or DVD media. A CD-only player does not become DVD-compatible because a DVD contains music.
Connect a writable recorder
Use an internal or USB CD/DVD recorder recognized by Windows. A drive that only reads discs cannot burn them.
Prepare compatible blank media
Match the blank disc to both recorder and player. Check its capacity and keep your original source files while preparing the music.
Use a data-disc profile when the target player supports music files from that type of disc.
Choose Data CD/DVD in Profile
Select Data CD/DVD, not Audio CD. The shown Profile menu has these two choices; it does not contain a separate MP3 CD entry.
Add compatible music files
Use Add Files for the MP3 or WMA collection. Review the file formats and encoding the recipient's player can decode, along with the disc's file-size capacity.
Select the recorder and test a disc
Choose the writable drive in Destination and use media the player accepts. Burn and test a first disc, including folder navigation and track sorting.
Load music or a supported video's soundtrack, then review the audio before editing or burning.
Select Add Files
Open Add Files and choose the intended sources. Common audio inputs include MP3, WMA, WAV, AAC, FLAC, OGG, and APE.
Confirm the intended sound
Preview each source. Supported video inputs such as MP4, AVI, WMV, MKV, FLV, and MPEG contribute their soundtrack to an Audio CD project, not their video picture.
Select a track for optional edits
Choose the intended entry and use Cut to open Video/Audio Trim when needed. Listen to the result before returning to the main list.
The populated example shows a nine-second MP3 source being prepared under the Audio CD profile. Keep the original sources available for later changes.
Arrange Tracks and Check Capacity
Check both sequence and capacity after adding tracks or changing their duration.
Arrange the source list
Use the list-order controls available after importing tracks and remove unwanted project entries. Review the resulting sequence before writing the disc.
Measure the correct kind of capacity
For Audio CD, compare total playing time with the capacity scale. For Data CD/DVD, check the file-size limit. Twelve five-minute tracks total sixty minutes even if their compressed files are small.
Check data-player sorting
Some MP3 and WMA players sort by folder or filename rather than the list on the PC. Use a simple structure and consistent prefixes such as 01-intro.mp3 and 02-song.mp3, then test the actual player.
Recheck total duration after trimming or changing speed. If the project is too long, shorten the list or divide it across discs rather than relying on source file size alone.
Trim and Adjust the Sound
Trim a Track's Beginning or End
Keep the desired section of one track using the Edit tab in Video/Audio Trim.
Open Cut for the selected source
Select the intended track in the main list, choose Cut, and open Edit in Video/Audio Trim.
Set the retained interval
Adjust the timeline handles or enter Start and End. Preview the retained section and check its Duration.
Confirm the edit
Select OK when the audio starts and ends where intended. Review the project's total time again before burning.
The Edit tab sets the segment boundaries and basic sound adjustments. Preview the selected section before confirming it.
The shown trim controls retain the section between Start and End. The opening music-note preview is an audio source, not evidence that a video picture will be included on an Audio CD.
Adjust Track Volume or Speed
Adjust one selected track and compare the result before committing it to the disc.
Open the Edit controls
Select the source, choose Cut, and open Edit.
Set volume or playback rate
Use Adjust Volume for the level and Adjust Speed for playback rate. The example shows 100% volume and 1.00 speed before changes.
Listen and recheck duration
Preview both quiet and loud sections. Reduce excessive boosts if the sound distorts, review duration after a speed change, and select OK when satisfied.
Select the actual writable drive when the result should be a physical listening disc.
Choose the profile and insert the disc
Review Profile and insert media that the recorder and destination player support. Use Audio CD with appropriate CD media for a traditional CD player.
Select the recorder in Destination
Choose the writable drive in Destination. Make APE Image File and Make BIN Image File save files and are not physical burners.
Burn and test
Recheck the tracks and capacity, then select Start. Keep the recorder connected and the PC awake until completion, then test playback on the intended player.
The screenshots were taken with file-output destinations visible. When a recorder is connected, confirm its actual drive entry rather than selecting an image destination and expecting the blank disc to change.
Save Audio CD Output as BIN or APE
Save Audio CD output on the PC without writing blank media immediately.
Choose Audio CD and prepare the tracks
Set Profile to Audio CD, add the source tracks, review their order, and finish the sound adjustments.
Choose the file destination
In Destination, select Make BIN Image File or Make APE Image File.
Set the path and start
Review Output Folder and choose the intended save location and filename. Use a writable drive with enough space, select Start, and check the finished files.
With Audio CD selected, Destination offers Make APE Image File and Make BIN Image File. Select the save path before starting.
These Audio CD destination choices are shown in the screenshot. Do not rename a BIN or APE file to ISO; changing an extension does not convert the output. See create an Audio CD image for a focused example.
Produce More Copies of a Tested Disc
Complete and test one disc before producing more copies from the same music collection.
Verify the first completed disc
Play representative tracks on the intended player. Check the sequence, track endings, and any fades or mixed audio.
Keep the source list and settings
Retain the same files, profile, track order, edits, and recorder destination. Review any copy-count option offered by the installed version before starting the next burn.
Write and check the next disc
Insert the next compatible blank when requested and wait for completion. A single recorder writes one disc at a time; keep checking media and playback during the batch.
For a later batch, retain the original sources and a record of their order and edits. See burn multiple Audio CDs for a repeat-production checklist.
Prepare Rewritable Media for Reuse
Reuse supported rewritable media only after confirming that its current contents can be removed.
Identify the disc and drive
Confirm the selected recorder and the type of media inserted. CD-RW can be rewritten, while CD-R cannot be erased and reused in the same way.
Review contents before erasing
Copy any contents you need elsewhere. Use the application's rewritable-media erase option when available, confirm the intended disc, and wait for the operation to finish.
Prepare and test the new burn
Recheck the profile, capacity, and recorder destination, then make a test disc. Confirm that the destination player accepts the rewritable media as well as the chosen disc format.
Erasing removes the existing disc contents. The supplied images do not show an erase dialog, so no unpictured button label or erase-mode setting is assumed.
Find Results and Fix Playback Problems
Test the Finished Disc on the Target Player
A completed write does not confirm that the disc will play correctly on every device. Test the hardware it was made for.
Check recognition and sequence
Insert the completed disc in the intended car stereo, home player, or portable player. Navigate forward and back; for MP3/WMA discs, check folder and filename sorting.
Listen across the disc
Play the first, middle, and final tracks. Check trimmed openings, endings, fades, sound balance, and any mixed or voice-processed material.
Resolve problems before making more copies
Use the checks below to review disc type, media, capacity, and edited sound. Recheck one revised disc on the target player before repeating the same burn.
What happens
What to check next
Start stays disabled
Add a readable source, choose a Profile and valid Destination, and check capacity. For a recorder, insert writable blank media; for file output, select a writable path.
A file appears, but the blank CD is unchanged
Destination is an image-file option. Select the physical recorder rather than Make APE Image File or Make BIN Image File.
The disc works on the PC, not in the car
Check disc type, media, and file-format support in the stereo manual. Use Audio CD for a traditional CD-only player.
An Audio CD playlist is too long
Compare playing time, not compressed source sizes. Shorten the list, trim unwanted sections, or divide it across discs.
MP3/WMA tracks play in an unexpected order
Check the player's folder and filename sorting. Use a simple structure and consistent track-number prefixes.
Sound is distorted after editing
Compare with the original and reduce volume or equalizer boosts. Preview a loud passage before burning again.
Writing fails or the last track skips
Check the drive connection, disc condition, and capacity. Try compatible blank media, keep the computer awake, and test the next disc before making more copies.
Find a Missing Recorder or Disabled Start
Check the writable drive, source list, and destination when Start is unavailable or the recorder is missing.
Check the drive in Windows
Confirm that the CD/DVD recorder is connected and recognized as a writable drive. Reconnect an external burner if needed, then reopen the application.
Check media and destination
Insert compatible writable blank media, choose the correct Profile, and select the drive in Destination. Close another program using that recorder.
Review the job inputs
Add a readable source and keep the job within capacity. For file output, choose a writable path in Output Folder instead of looking for a blank disc.
Compare the edited sound with its original before burning another disc.
Find the affected track
Play the source and the prepared version at a similar listening level. Check a loud passage as well as the beginning.
Review volume, EQ, and mixed music
In Cut > Edit, reduce an excessive Adjust Volume setting. Review boosts in Equalizer and the added music's volume in Mix.
Listen again and confirm
Preview the revised track, select OK, and review the disc project. Avoid repeatedly applying stronger boosts to an already distorted source.
Find and Check a BIN or APE Result
Locate the files created by a file-output destination, then check them with software that supports their format.
Review the actual save path
Check Output Folder and the filename used for the completed job. Compare the extension with the selected Make BIN Image File or Make APE Image File destination.
Keep the output files together
Confirm that the output exists and preserve any companion files generated with it. Keep the original music tracks and a record of the playlist and edits separately.
Use supporting playback or burning software
Choose a tool that accepts the saved format and check the intended sound or disc layout. To make a physical disc directly in this guide, return to the recorder destination.
Saving BIN or APE output does not mean a blank disc has been written. It also does not replace the source tracks needed for later playlist changes.
MP3 CD Maker FAQ
Which profile should I choose for a normal CD player?
Choose Audio CD in Profile and select your disc burner in Destination. Audio CD creates the music-disc format used by traditional CD players. Data CD/DVD stores files and requires a player that supports those file formats.
How do I make an MP3 CD instead of an Audio CD?
Use the Data CD/DVD profile with MP3 files and writable CD media. Keep the collection within the disc's file-size capacity and check that the destination player supports MP3 from that type of disc. The Profile menu shown in this guide lists Audio CD and Data CD/DVD, not a separate MP3 CD entry.
Why does my playlist fit under 700 MB but not on an Audio CD?
An Audio CD is limited by playing time rather than the original MP3 or FLAC file size. A common Audio CD holds up to about 80 minutes, depending on the media. Compare the total track duration with the software's capacity scale; remove tracks, trim sections, or use another disc if the list is too long.
Can I use WAV, FLAC, or video files to make an Audio CD?
Yes. GiliSoft MP3 CD Maker accepts audio sources such as MP3, WMA, WAV, AAC, FLAC, OGG, and APE, and supported video sources such as MP4, AVI, WMV, MKV, FLV, and MPEG. Video input contributes its soundtrack; an Audio CD does not include the video's picture.
Can I trim tracks, add fades, or mix background music?
Yes. Select the track and open Cut. The Edit tab has Start, End, volume, speed, fade-in, fade-out, and reverse controls. The Mix tab has Load Music, timing, volume, fades, and Repeat music. Preview the result and select OK to return to the disc project.
Why was an APE or BIN file created instead of a burned CD?
Destination was set to an image-file option. With Audio CD selected, Make APE Image File and Make BIN Image File save output to your PC. To write a physical CD, insert a blank disc and choose the disc recorder as Destination instead.
Why does the disc play on my computer but not in my car?
The car stereo may not support the chosen disc type, recordable media, or MP3/WMA encoding. Confirm its specifications. For a traditional CD player, use Audio CD on supported CD media rather than an MP3 data disc or a DVD, and test the completed disc in the actual stereo.
What should I do if Start is disabled or the recorder is missing?
Add a readable source file, choose a valid Profile and Destination, and check that the selected disc has enough capacity. For a physical burn, Windows must recognize a writable drive and compatible blank media. A read-only CD/DVD drive cannot burn discs; for file output, check that the destination folder is writable.
Is GiliSoft MP3 CD Maker free?
GiliSoft MP3 CD Maker is paid Windows software with a trial download. The Buy Now buttons in this guide link to the official purchase page and show the lifetime license for 1 PC at $34.95. Check the selected plan at checkout.
Does Mix arrange or join the separate tracks on the disc?
Mix layers added music inside the selected source track. Use the main source list to arrange the disc sequence. Repeat music in Mix repeats the added background music; it is not a command to repeat the entire disc playlist or crossfade every track.
Does Adjust Speed guarantee that the original pitch stays unchanged?
The Edit screenshot shows Adjust Speed but no preserve-pitch switch. Listen to both rate and tone after a change and review the resulting duration. Change of Voice provides separate presets and Pitch controls for deliberate sound changes.
Music CD Burning Guides by Task
Choose a focused guide for the disc format, source type, or saved output you need.
Prepare the tracks, choose the right disc format, and burn with GiliSoft MP3 CD Maker. Create a listening copy for the car, home, or a compatible music player.