
Confirm that each video or audio file opens correctly and contains the material you intend to convert.
GiliSoft Video Converter for Mac Guide
How to Use GiliSoft Video Converter for Mac
Convert video and audio files on Mac, then trim, merge, crop, rotate, adjust, watermark, and subtitle the media when the conversion job needs more than a format change.
Before You Convert
A short check before conversion helps avoid choosing the wrong profile, cutting the wrong time range, or saving the finished file to an unexpected folder.
Decide whether the file is for Mac playback, a phone, a website, an archive, a client, or another editing application.
High-resolution and batch conversion jobs may require substantial temporary and output space.
Convert a short sample first when changing resolution, bitrate, frame size, subtitles, or picture adjustments.
1. Convert Video and Audio Files on Mac
Use the main queue for MOV to MP4 conversion, video-to-audio extraction, batch jobs, device profiles, and other routine format changes.
- Click Add and select one or more video or audio files.
- Review the source format, resolution, duration, and file size shown in the queue.
- Choose a Video, Audio, Device, HD, or Web Sharing output profile.
- Choose the output folder and adjust the target settings when required.
- Click Start, then open the output folder and check the finished file.
To convert MOV to MP4 on Mac, add the MOV file and select MP4 from the Video profiles before starting the conversion.
2. Trim Video or Audio by Time Range
Keep the useful section of a clip or remove unwanted material before the converted file is created.
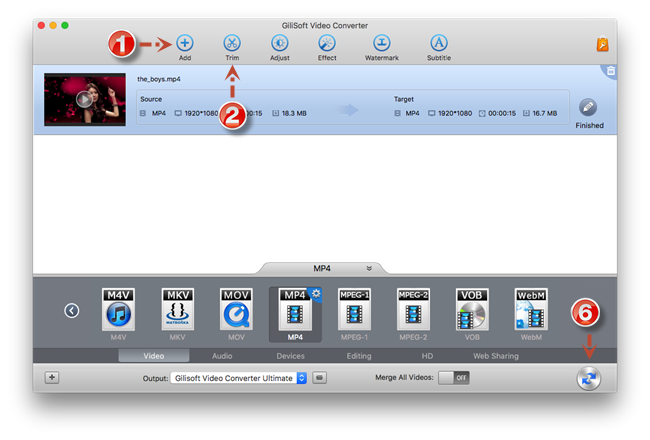 Open the Trim tool from the main toolbar. Click to enlarge.
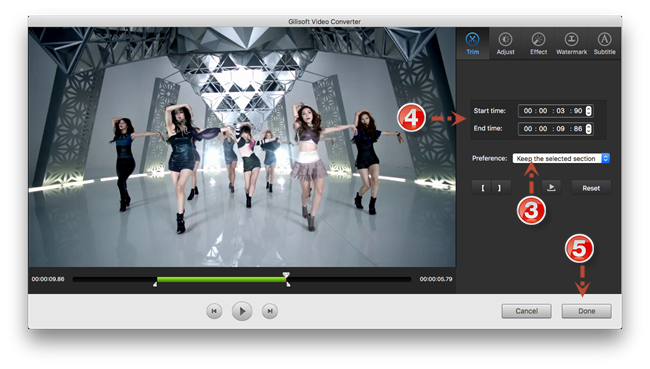 Choose the cutting mode and set the start and end time. Click to enlarge.
- Add the source file and select it in the conversion queue.
- Click Trim on the top toolbar.
- Choose whether to keep the selected section or remove it.
- Set the start and end time with the controls or timeline.
- Click Done, select the output profile, and start conversion.
3. Merge Multiple Videos into One File
Combine related clips into one output when the source material belongs to the same lesson, presentation, event, or delivery package.
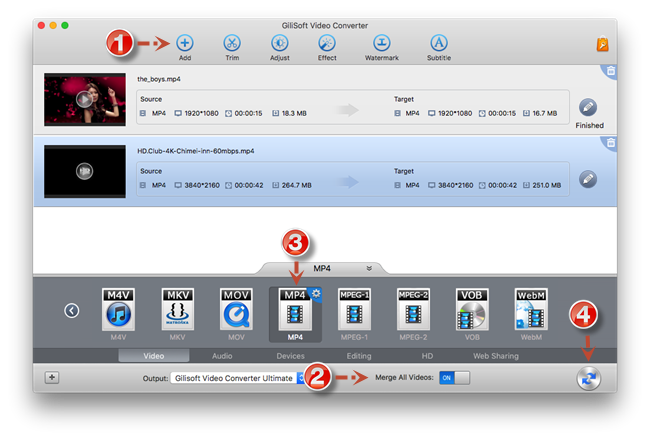 Multiple source files with Merge All Videos enabled. Click to enlarge.
- Add all videos that should appear in the combined output.
- Check the file order in the queue.
- Turn on Merge All Videos.
- Select one output profile and destination for the merged file.
- Start conversion and review the joins in the finished video.
4. Crop, Rotate, Flip, and Reframe Video
Remove unwanted edges, correct sideways footage, flip the picture, and control the visible frame and aspect ratio.
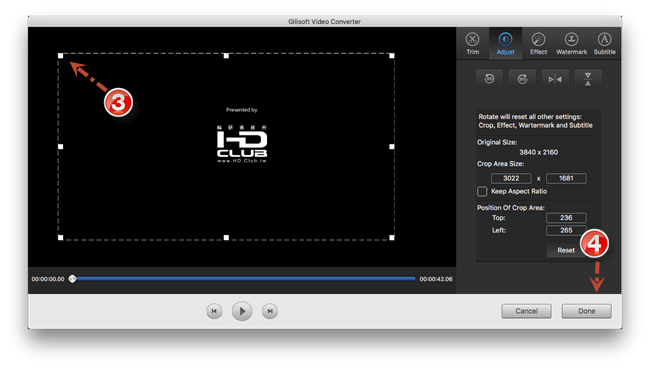 Crop controls for defining the visible video area. Click to enlarge.
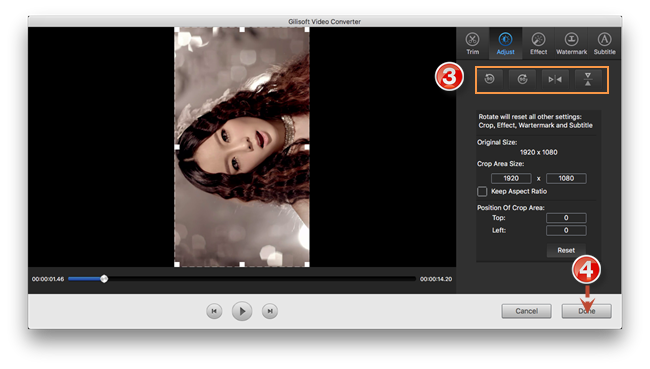 Rotation, flip, crop, and aspect-ratio controls. Click to enlarge.
- Add the video and open Adjust from the toolbar.
- Use Crop to remove black bars or unwanted edge content.
- Use Rotate or Flip when the video orientation is incorrect.
- Keep the original aspect ratio or choose the ratio required by the destination.
- Preview the frame, click Done, and convert a short sample before processing a long file.
5. Adjust Picture, Volume, and Video Effects
Correct basic picture settings or apply a visual treatment before creating the converted file.
- Select the video and click Effect on the toolbar.
- Adjust volume, brightness, contrast, or saturation as needed.
- Choose a visual effect only when it suits the finished project.
- Compare the preview with the original picture.
- Click Done and convert a short sample to confirm the result.
6. Add a Text or Image Watermark
Place a brand name, label, ownership notice, or image mark over the video before conversion.
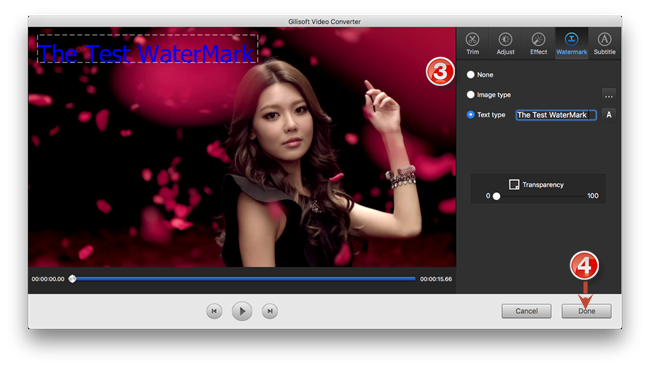 Text and image watermark controls with position and transparency settings. Click to enlarge.
- Add the source video and click Watermark.
- Choose a text watermark or load an image watermark.
- Set its position and size over the preview.
- Adjust transparency so the mark remains visible without covering important content.
- Click Done and review the converted output at several points in the timeline.
7. Add and Position a Subtitle File
Load an external subtitle track and control how it appears in the converted video.
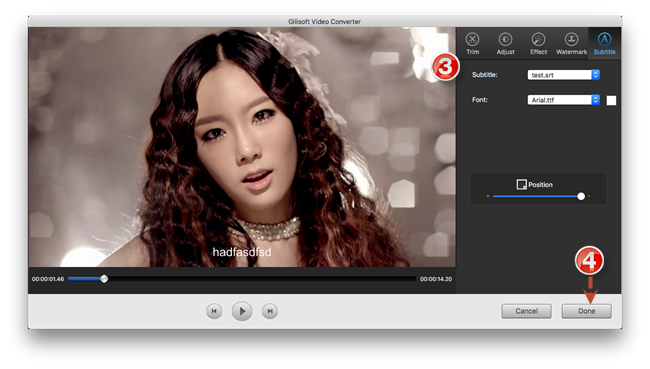 Subtitle file, font, and position controls. Click to enlarge.
- Add the video and click Subtitle.
- Load the subtitle file that matches the video.
- Choose a readable font and subtitle position.
- Preview several points to check timing and placement.
- Click Done, start conversion, and verify the complete output.
If subtitles drift out of sync, first confirm that the subtitle file was prepared for the same version and duration of the source video.
8. Extract Audio or Adjust Video Volume
Choose an audio profile when only the soundtrack is needed, or use the Effect panel to change the volume of a video before conversion.
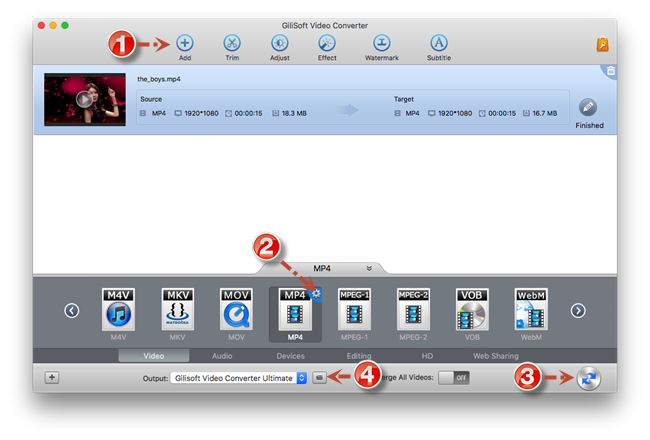 Select the Audio category for MP3, M4A, WAV, WMA, AC3, DTS, and related profiles. Click to enlarge.
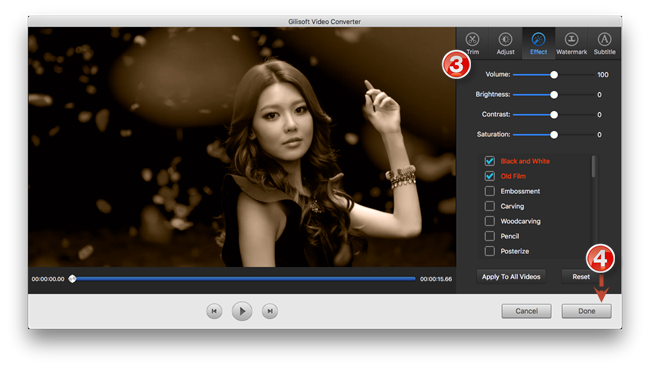 Use the Effect panel when the source volume needs adjustment. Click to enlarge.
- Add the source video or audio file.
- Choose an Audio profile when extracting sound from video.
- Open Effect and adjust Volume when the source level needs correction.
- Choose the destination folder and start conversion.
- Listen to the beginning, middle, and end of the finished audio or video.
Supported Output Categories
The available profile categories help match the output to the next use rather than forcing every job into one general format.
Video Formats
MP4, MOV, AVI, MKV, M4V, MPEG, VOB, WebM, WMV, and other practical video profiles.
Audio Formats
MP3, M4A, WAV, WMA, AC3, DTS, and related audio profiles for listening, editing, or archive use.
Delivery Profiles
Device, HD, and Web Sharing categories for phones, tablets, Apple TV, playback devices, and online delivery.
Final Conversion Checklist
Video Converter for Mac FAQ
How do I convert MOV to MP4 on Mac?
Add the MOV file, choose MP4 from the Video profiles, select an output folder, and start conversion.
Can I batch convert multiple videos?
Yes. Add multiple source files to the queue and process them in the same conversion run.
Can I convert a video to MP3?
Yes. Add the video and choose MP3 or another audio profile when only the soundtrack is needed.
Why is there no sound in the converted video?
Check the source audio, confirm the selected output profile includes audio, and convert a short test before processing the full file.
How do I keep the original aspect ratio?
Open Adjust, use the crop and aspect-ratio controls, and keep the original ratio before completing the conversion.
Where are converted files saved?
Check the output destination shown in the main conversion window, then open that folder after the job finishes.
Convert and Prepare Video and Audio Files on Mac
Use one Mac application for conversion, batch processing, trimming, merging, framing, picture adjustment, watermarks, subtitles, and audio output.
Download Trial


