
Choose the Workflow That Matches the Delivery
| Need | Recommended approach | Reason |
|---|---|---|
| ISO still needs content review | Mount it first | Correct the image before using blank media |
| ISO is approved and fits a CD | Burn to compatible CD | Use only when image size and recipient drive support CD |
| ISO is too large for CD | Use compatible DVD media | Match both recorder and recipient hardware |
| Need repeated identical copies | Burn from one verified ISO | Keeps the content and layout consistent across discs |
Prepare the Files, Media, and Access Plan
Confirm the source
Open representative files, remove unintended copies, and keep a verified backup before authoring.
Match capacity and hardware
Check image or project size against compatible media, recorder, and recipient drive support.
Protect the password
Use a long unique credential, retain it securely, and deliver it separately from the disc or ISO.
Plan verification
Test access, structure, and sample files on a separate compatible Windows computer.
Burn an Encrypted ISO: 6 Steps
Mount and approve the encrypted ISO
Confirm the image opens, the password works, and the secure/public file layout matches the approved release.
Check image size and media type
Choose blank CD or DVD media with enough capacity and confirm that the optical recorder supports it.
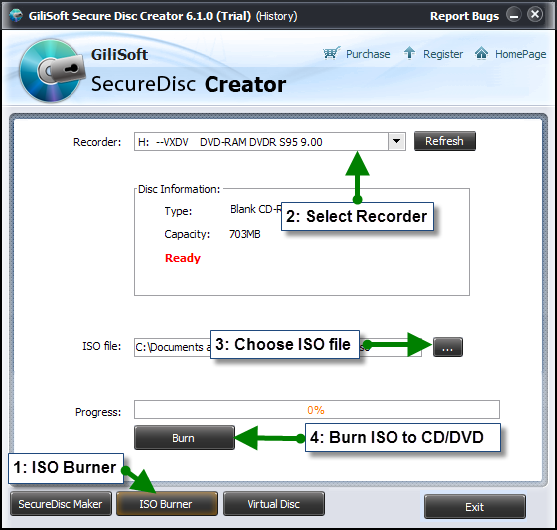
Open ISO Burner and select the recorder
Use the ISO Burner workspace, choose the intended optical drive, and refresh the list after inserting media if necessary.
Select the verified ISO file
Browse to the approved image and confirm its filename, location, revision, and size before writing.
Burn without interruption
Start the burn, close software using the drive, and prevent sleep, shutdown, or disc removal until completion.
Verify the physical disc
Reinsert the disc or test it on another Windows PC, then open public files, enter the password, and read representative protected files.

Build Verification into the Workflow
Approve before burning
Treat the mounted ISO as the content review stage and the burner as the production stage.
Use reliable blank media
Poor media or an incompatible recorder can fail even when the ISO itself is valid.
Prevent interruption
Microsoft notes that power-state changes during writing can interrupt a burn and cause data loss.
Verify the physical result
The finished disc must be tested independently from the source ISO.
Use GiliSoft Secure Disc Creator for the Protected Workflow
Secure Disc Creator includes encrypted ISO creation, virtual-drive testing, and an ISO Burner in the same Windows product. Keeping these stages together makes it easier to verify one image and then produce consistent protected discs.
- Create password-protected CD, DVD, and ISO projects on Windows.
- Separate public files from secure files when the delivery needs both access levels.
- Mount encrypted images for validation and burn approved ISOs to compatible media.
Troubleshooting
- The recorder is missing: reconnect the drive, insert media, and select Refresh.
- The ISO does not fit: choose higher-capacity compatible media rather than forcing an undersized disc.
- Burning fails immediately: confirm the disc is blank, writable, and supported by the selected recorder.
- The burn stops midway: prevent sleep, close drive-using software, and retry with reliable media.
- The disc mounts but secure files fail: return to the source ISO and verify it before reburning.
- Different copies behave differently: use the same approved ISO and consistent media/recorder settings.
Protect the Password and the Production Source
Optical media can be lost, copied, damaged, or delivered to the wrong person. Encrypt only authorized content, keep a backup before authoring, store passwords or recovery information in an approved location, transmit credentials separately, and preserve the verified ISO or source files under appropriate access control.
Frequently Asked Questions
Should I mount an encrypted ISO before burning it?
Yes. Verify its layout, password, and files before consuming blank media.
Can I burn an ISO larger than the disc capacity?
No. Use compatible media with enough capacity or rebuild a smaller image.
Is burning an ISO the same as copying the ISO file onto a disc?
No. Use an ISO-burning workflow that writes the image structure to the optical medium.
Can I make several discs from one encrypted ISO?
Yes. A verified ISO can serve as the controlled source for repeat copies.
Why test the physical disc after a successful burn?
Media, recorder, or write errors can affect the disc even when the source image is valid.
Can Windows mount the encrypted ISO directly?
Use the Secure Disc Creator virtual-drive workflow so the product can handle the protected image as designed.