
GiliSoft Secure Disc Creator User Guide

How to create an encrypted CD, DVD, or ISO image

Place open instructions in a public area and confidential files in a password-protected secure area. You can burn final media immediately or create an encrypted ISO, mount it for verification, and burn it later.

Public and secure areasEncrypted ISO imagesVirtual drive testingBuilt-in CD/DVD burning
Home > How to Use > Secure Disc Creator

Choose the task you need

Public area and secure area explained

Public Area

Place readme files, instructions, catalogs, or other content here when recipients should be able to open it without entering a password.

Secure Area

Place confidential documents, installers, media, and archives here. Files in this area remain encrypted until the recipient enters the correct password.

Create protected disc or ISO media

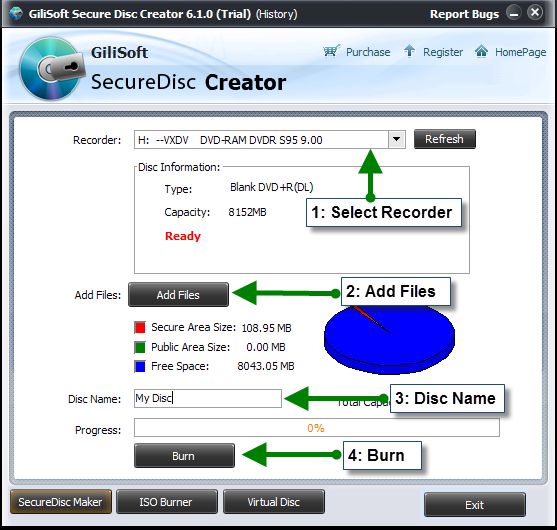
1. Start an encrypted CD or DVD project

Use the built-in burner when blank optical media is inserted and you want to produce the final protected disc immediately.

1Insert a supported blank CD or DVD.
2Open Secure Disc Creator and select the physical burner from the device list.
3Choose the disc settings required by the target media.
4Continue to add files for the public and secure areas.

2. Add public files and protected files

Organize the delivery before burning so recipients can immediately distinguish open instructions from password-protected content.

1Click Add Files to select source files and folders.
2Place open instructions and general content in the Public Area.
3Place confidential content in the Secure Area.
4Review the file layout before creating the final output.

3. Set the secure-area password and burn

The password controls access to the protected area; public files remain available without it.

1Click Burn after the file layout is ready.
2Enter and confirm a strong password for the secure area.
3Start the burn process and keep the media inserted until completion.
4Test both the public area and password-protected area before delivery.
Store the password securely and send it to the recipient through a separate channel from the physical disc.

4. Create an encrypted ISO image

Choose this route when the project should be archived, transferred, reviewed, or burned at a later time.

1Select Make ISO Image File from the device or output list.
2Add files to the public and secure areas.
3Click Make Image and set the secure-area password.
4Choose the ISO destination and wait for image creation to finish.

5. Mount and verify the ISO in a virtual drive

Validate file placement and password access before producing final physical media.

1Open the virtual-drive tool in Secure Disc Creator.
2Select the encrypted ISO image you created.
3Choose an available virtual drive letter.
4Click Mount, then test public and secure content from Windows Explorer.

6. Burn an existing ISO to a blank disc

This task starts from a completed ISO image. You do not need to add the source files again.

1Insert compatible blank CD or DVD media.
2Open the ISO burning tool and select the completed ISO image.
3Select the physical burner and confirm the burn settings.
4Start burning, then verify the completed disc after it is finalized.

How recipients open the secure area

Secure Disc Creator agent password window

Open protected content without installing the full creator application

1Insert the encrypted disc or open the mounted image.
2Run agent.exe from the disc.
3Enter the secure-area password.
4Open the protected files, then close the secure area when finished.
Recipients need the password and the included disc agent, not the full Secure Disc Creator authoring application.

Choose the right production path

PathWhen to use itRecommended sequence
Burn encrypted disc nowYou have blank media and need the final physical disc immediately.Add files → set password → burn → verify
Create encrypted ISO firstYou need an archive, transfer file, review stage, or delayed production.Add files → create ISO → store or transfer
Mount ISO before releaseYou want to verify layout and password access before burning.Create ISO → mount → test public and secure areas
Burn an existing ISOThe ISO is already approved and ready for physical production.Select ISO → choose burner → burn → verify

Secure Disc Creator FAQ

Does Secure Disc Creator include disc burning?

Yes. It can create protected CD/DVD media and burn completed ISO images with its built-in burning tools.

Can one disc contain public and protected files?

Yes. Public files remain openly accessible while secure-area files require the correct password.

Does the recipient need the full application?

No. The included disc agent opens the secure area after password verification.

Can I test an ISO before burning?

Yes. Mount it in the virtual-drive tool and verify both areas before producing physical media.

Can I create an ISO now and burn it later?

Yes. Encrypted ISO output is suitable for archiving, transfer, validation, and later disc production.

Which optical media can be used?

The software supports common recordable and rewritable CD/DVD media. Available choices also depend on the installed burner.

More secure disc guides

Create protected offline media with one workflow

Prepare public instructions and encrypted files, validate an ISO, and burn final CD/DVD media when it is ready for delivery.

View Secure Disc Creator