How to Use GiliSoft Secure Disc Creator
Choose the task you need: create a protected CD/DVD or ISO, assign public and confidential files, open content with its password, mount an image, or burn and verify physical copies.
Create a Password-Protected CD or DVD
Use SecureDisc Maker for a new physical disc from your source files. Keep the originals and prepare a small test project before making a larger set. For saved image output, use Create an Encrypted ISO instead.
Select the CD or DVD recorder
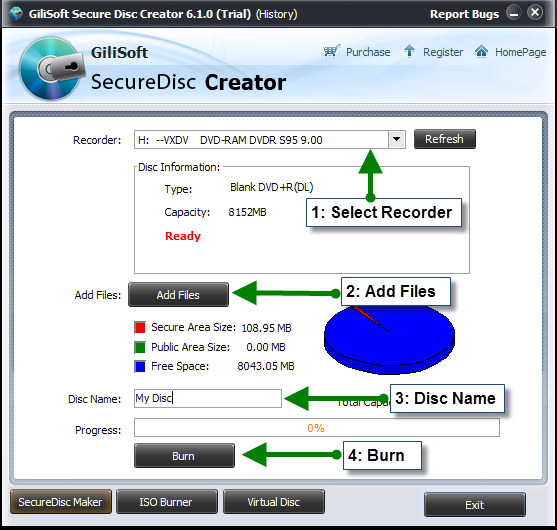
Insert a compatible blank CD or DVD, open SecureDisc Maker, and choose the writable drive in Recorder. Check the disc Type and Capacity before adding files.
The SecureDisc Maker tab creates a protected disc from your source files. Select the actual drive in Recorder; use Refresh after changing media or connecting an external burner.
A read-only CD/DVD drive cannot write the disc. Wait until the correct device and blank media are shown as ready, then continue with the file layout.
Add files to the Public Area and Secure Area
Select Add Files and use Explorer View to find the source files or folders. Drag each item into the intended Public Area or Secure Area in Disc Layout, then close the Add Files window and review the project.
- Locate the source in Explorer View
Browse the source folder in the upper part of Add Files.
- Drag each item to its intended area
Use Secure Area for confidential content and Public Area for open material in the lower Disc Layout.
- Close Add Files and review the totals
Check that the right files were assigned to each area and that Secure Area Size, Public Area Size, and Free Space suit the selected media.
For example, put opening instructions in Public Area and the project documents in Secure Area. Keep the secure-area password separate from those public instructions.
Set the secure-area password and burn
Check Disc Name and the space used by both areas, then select Burn. Enter matching Password and Confirm Password values, select OK, and wait for disc creation to finish before removing the media.
- Review the disc project
Check Disc Name, Secure Area Size, Public Area Size, and Free Space. Confirm the project fits the chosen media and the files are assigned to the intended areas.
- Select Burn and set the password
Choose Burn. In the dialog, enter matching values in Password and Confirm Password, then select OK. Retain the password securely.
- Let writing finish and test the output
Keep the recorder connected and the media inserted until the job completes. Test the finished disc with its included agent.exe before delivery.
The screenshot shows a six-character minimum and low-strength feedback for its example password. Choose your own password and keep it separate from the output.
Test the public files and open the secure area
Open the finished disc in Windows File Explorer and check the public files. Run the included agent.exe, enter the secure-area password, and select Open to check the protected files before handing over the disc.
- Open the finished disc or mounted image
Use Windows File Explorer to inspect the intended output. Open a public readme or another deliberately public file without the secure-area password.
- Run the included agent and enter the password
Run agent.exe from that output, enter its secure-area password, and select Open. Recipients use the included agent rather than installing the full authoring application.
- Verify protected contents and finish the session
Open representative protected files and confirm their expected contents. Close documents and finish secure-area access before ejecting the disc or unmounting the image.
Understand Public Area and Secure Area
Public Area
Use this for readme files, catalogs, instructions, or other material the recipient should open without a password. Do not put confidential content here just because another part of the same disc is encrypted.
Secure Area
Use this for private documents, folders, archives, media, or installers. Access to these files requires the secure-area password through the included disc agent.
Review the destination in Disc Layout before creating the output. The areas determine access; the disc name alone does not protect a file placed in the public section.
Create an encrypted ISO image
Choose this route when you want a saved image to review, archive, transfer, or burn later. You do not need to insert a blank disc just to create the ISO.
- Select Make ISO Image File
In SecureDisc Maker, choose Make ISO Image File from Recorder. Review Image Size so the project fits the intended CD or DVD if it will be burned later.
- Prepare the two file areas
Use Add Files, place each item in Public Area or Secure Area, and review Disc Name and the space totals.
- Create and save the image
Select Make Image, complete the secure-area password prompt, and choose the ISO save location when requested. Wait for image creation to finish.
Keep the ISO in a location with enough free space and retain the password separately. Mount and test the completed image before treating it as the master for later discs.
Mount and Test an ISO in Virtual Disc
- Open Virtual Disc and choose the ISO
Select Virtual Disc at the bottom of the app, then browse for the completed Image File.
- Choose an available virtual drive letter and mount
Select a free Drive letter and review Automatically open the drive. Choose Mount.
- Inspect public files and unlock the secure area separately
Open the mounted drive and check its public layout. Run the included agent.exe and enter the password to inspect protected files. Mounting makes the image accessible; it does not bypass secure-area password verification.
Unmount the ISO After Use
- Finish using the mounted content
Save any work elsewhere as needed, close files opened from the image, and finish the secure-area session. Close Explorer windows or applications using the virtual drive.
- Select the mounted drive in Unmount Drive
Return to Virtual Disc. In the lower Unmount Drive section, choose the intended mounted Drive, not another virtual drive.
- Unmount and check the drive state
Select Unmount and confirm the intended virtual drive is no longer available in File Explorer. Keep the ISO file for future mounting or burning.
Burn an existing ISO image to CD or DVD
Use ISO Burner when the encrypted image is already complete. This writes the existing image layout; you do not need to add the original files or rebuild its public and secure areas.
- Insert compatible blank media
Choose a CD or DVD that can hold the ISO and is supported by the recorder.
- Open ISO Burner
Select the recorder and use the browse button beside ISO file to choose the completed image.
- Burn and verify the disc
Select Burn, wait for completion, then check the physical disc's public files and the secure-area password through agent.exe.
Burn the image, not just the file. Putting an ISO file onto an ordinary data disc stores that ISO as one file. Use ISO Burner to create the intended optical-disc layout and check the result in the recipient workflow.
Verify, Repeat, or Replace the Output
Test the Finished Disc or Image
- Check the public and secure layout
Open the finished physical disc or mounted ISO. Verify that only intended public files are readable without the secure-area password.
- Test password opening and file contents
Run the included agent.exe, enter the password, and open representative protected files. Check the intended Windows recipient PC before handing over a larger delivery.
- Verify the physical copy as well as the image
If the ISO was burned to disc, test that finished disc rather than relying only on the source ISO test. Confirm that its layout and agent work and that it is not merely a data disc containing one ISO file.
Make More Discs from a Verified ISO
- Keep a tested master image
Create the encrypted ISO and use Virtual Disc to verify public files and password access. Keep the master ISO, source files, and password record organized.
- Burn the master with ISO Burner
Use ISO Burner to choose the verified ISO and the intended recorder. Insert compatible blank media with enough capacity and complete each burn before moving to the next copy.
- Check and identify the completed copies
Check each finished disc and its password-opening workflow. Label the intended version without exposing the password, and keep the verified master for later copies.
Update the Content or Password
- Return to the retained source files
Identify the files, Public/Secure Area assignments, and password changes intended for the replacement. Keep the previous source project and verified backups.
- Create a replacement disc or ISO
Prepare the revised layout in SecureDisc Maker. Choose physical burning or ISO output, set the intended password during creation, and identify the new version clearly.
- Test the new output before distributing it
Verify public access, agent opening, and protected contents using the new password. A replacement does not change the password on discs or ISO copies already delivered; do not treat it as revoking old copies.
Choose between direct burning and ISO creation
| Path | Use it when |
|---|---|
| Burn a new protected disc | You have source files and blank media ready. Choose the recorder, prepare both areas, set the password, and burn. |
| Create an ISO first | You want saved image output. Choose Make ISO Image File, prepare the areas, and use Make Image. |
| Mount and test the ISO | You want to inspect the layout and password access before physical production. Use Virtual Disc, then test agent.exe separately. |
| Burn the completed ISO | The image is already prepared and checked. Choose ISO Burner, select the ISO and recorder, and write compatible media. |
For a batch of identical discs, verify one complete output before producing the rest. Keep the tested ISO, its source files, and the password record organized so a future copy uses the right project.
Check the result and troubleshoot opening problems
| Problem | What to check next |
|---|---|
| Recorder or media is not ready | Confirm Windows recognizes a writable drive, insert compatible blank media, select the correct Recorder, and use Refresh. |
| The project is too large | Review both area sizes and Free Space. For an ISO, choose an Image Size that suits the later physical media and reduce the file set if necessary. |
| Confidential files open without a password | Check whether they were assigned to Public Area or whether you are viewing a source copy. Correct the layout and create a new output before delivery. |
| The ISO is mounted but secure files remain closed | Run the included agent.exe from that mounted image and enter the correct secure-area password. Mounting alone does not unlock it. |
| The finished disc contains only one ISO file | Use ISO Burner to burn the image rather than adding the ISO as an ordinary file to a data-disc project. |
| The password is rejected | Check that the selected disc or image matches the password record, including capitalization and keyboard layout. Do not treat the recipient's password prompt as a reset tool. |
| The agent cannot run on the recipient PC | Confirm it is the included agent from the tested output and that the recipient uses Windows. Review the PC's application policy with its administrator before distributing more discs. |
Keep the original files until the recipient test succeeds. If the layout or password needs to change, return to the source project and create a replacement disc or image rather than assuming the completed media can be edited like a normal folder.
Secure Disc Creator FAQ
Can one disc contain both public and password-protected files?
Yes. Use Public Area for material recipients can open without a password and Secure Area for confidential files. Check the destination of each item in Disc Layout before creating the disc or ISO. A file placed in Public Area is not protected by the secure-area password.
Does the recipient need to install Secure Disc Creator?
The recipient uses Windows to run the included agent.exe from the disc or mounted image and enter the password. The full authoring application is not required just to open the secure area. Test this workflow on the intended recipient PC before distributing a batch.
Does mounting an encrypted ISO also unlock its secure files?
No. Mounting makes the ISO contents accessible as a drive. Public files can be opened directly, but the secure area still requires the included agent.exe and the correct password. Mounting and password verification are separate steps.
Can I make an encrypted ISO now and burn it later?
Yes. Choose Make ISO Image File in Recorder, prepare the two areas, and use Make Image. Test the completed ISO with Virtual Disc. Later, use ISO Burner to write that existing image to compatible blank media without adding the original source files again.
Should I burn the ISO as a file on an ordinary data disc?
Use ISO Burner to write the completed image as a disc image. Copying an ISO file onto a data disc instead stores the ISO as one file and does not create the same disc layout. Verify the finished physical disc and its included agent before delivery.
Does password protection stop the ISO file itself from being copied?
The password protects access to Secure Area, not whether the ISO container can be copied. A copied ISO still needs the password to open protected content, while Public Area remains readable. Keep the password separate from the image.
Why is my burner missing or the disc not ready?
Check that Windows recognizes a writable CD/DVD drive, that the connected drive is selected in Recorder, and that the blank media is compatible. Select Refresh after changing the media or connecting an external burner. Close another application using the same drive and confirm that the project fits the available capacity.
What should I do if the secure-area password does not work?
Confirm that you are opening the intended disc or ISO and using its password, including the correct capitalization and keyboard layout. The recipient password dialog is for opening content, not resetting the password. Keep the password securely when creating the project and retain source files so a replacement can be made if necessary.
Is Secure Disc Creator free, and which license do these buttons show?
A Windows trial download is available. The Buy Now buttons in this guide show the lifetime license for 1 PC at $49.95 and link to the official purchase page. Check the installed trial screen for the current limits and select the intended plan at checkout.