
Choose the Workflow That Matches the Delivery
| Need | Recommended approach | Reason |
|---|---|---|
| Recipient needs instructions before password entry | Put instructions in Public Area | They remain available without exposing protected files |
| Confidential documents or media | Put them in Secure Area | The password is required before access |
| All content is confidential | Use Secure Area only | Avoid an unnecessary public section |
| All content is unrestricted | Use a normal data disc | Encryption adds complexity without a security benefit |
Prepare the Files, Media, and Access Plan
Confirm the source
Open representative files, remove unintended copies, and keep a verified backup before authoring.
Match capacity and hardware
Check image or project size against compatible media, recorder, and recipient drive support.
Protect the password
Use a long unique credential, retain it securely, and deliver it separately from the disc or ISO.
Plan verification
Test access, structure, and sample files on a separate compatible Windows computer.
Create Secure and Public Disc Areas: 6 Steps
Classify every file before authoring
Create separate approved source folders for public and confidential content so temporary or duplicate files are easier to spot.
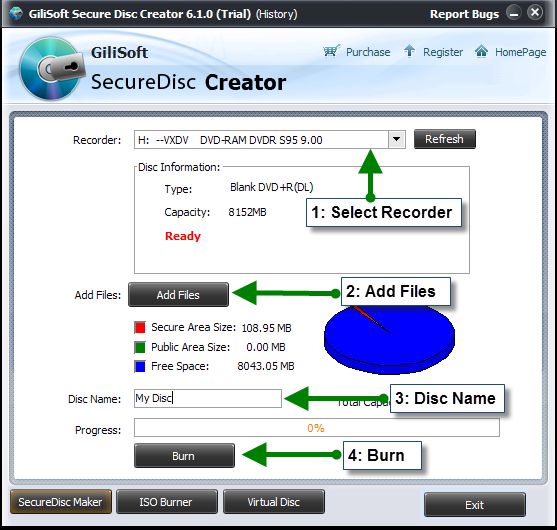
Choose a disc or ISO target
Select a physical recorder for direct burning or Make ISO Image File when the layout should be tested first.
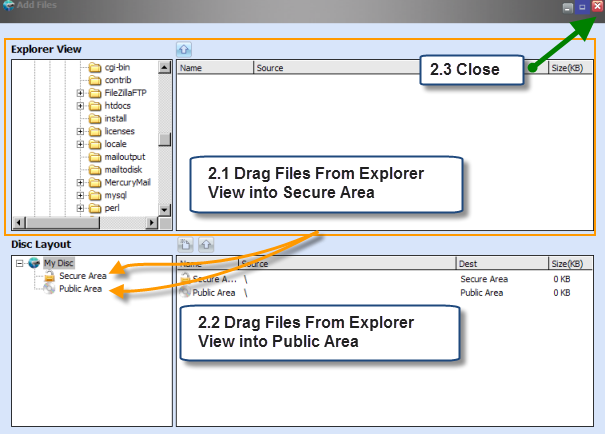
Add unrestricted content to Public Area
Place only intentional public material such as instructions, support contacts, or non-sensitive reference files here.
Add confidential content to Secure Area
Drag protected folders into Secure Area and inspect the destination tree for duplicates or misplaced files.
Set the secure-area password
Use a long unique password, store it separately, and do not include it in public instructions on the disc.
Create and verify both access paths
Burn or build the ISO, then confirm public files open without the password and secure files remain locked until the correct password is entered.
Build Verification into the Workflow
Classify before dragging
A clean source structure reduces the risk of putting a confidential duplicate in Public Area.
Keep public instructions minimal
Do not reveal sensitive filenames, passwords, customer data, or internal paths in the readme.
Review both trees
Check file names, folders, duplicates, and area totals immediately before image creation or burning.
Test without and with password
First browse as an unauthenticated recipient, then verify the secure workflow with the approved password.
Use GiliSoft Secure Disc Creator for the Protected Workflow
Secure Disc Creator supports a Public Area for unrestricted files and a Secure Area for password-protected content on the same CD, DVD, or encrypted ISO. It also provides virtual-drive testing so the two access paths can be verified before physical production.
- Create password-protected CD, DVD, and ISO projects on Windows.
- Separate public files from secure files when the delivery needs both access levels.
- Mount encrypted images for validation and burn approved ISOs to compatible media.
Troubleshooting
- A confidential file is visible immediately: it was likely placed in Public Area; rebuild the project.
- Public instructions ask for a password: confirm they are under Public Area rather than Secure Area.
- Files are duplicated in both areas: remove the public copy of any confidential material.
- The area totals look wrong: reopen Add Files and review each destination folder and duplicate.
- Recipients cannot identify the protected section: add concise public instructions without exposing the password.
- The disc behaves differently on another PC: verify media compatibility and test the exact final disc.
Protect the Password and the Production Source
Optical media can be lost, copied, damaged, or delivered to the wrong person. Encrypt only authorized content, keep a backup before authoring, store passwords or recovery information in an approved location, transmit credentials separately, and preserve the verified ISO or source files under appropriate access control.
Frequently Asked Questions
What is the Public Area?
It contains files that recipients can open without entering the secure-area password.
What belongs in the Secure Area?
Place confidential documents, media, archives, and any material that should require the password there.
Can the same file be placed in both areas?
Technically it may be possible, but doing so defeats protection for that file because the public copy remains open.
Should the password be stored in Public Area?
No. Send the password through a separate trusted channel.
Can I test the layout before burning?
Yes. Create an encrypted ISO and mount it in the product virtual drive.
Do I need both areas on every disc?
No. Use only the areas needed for the recipient workflow and confidentiality requirements.