
Record Training Videos on Mac
Reliable Mac recording depends on three things: the correct capture scope, the correct macOS permissions, and a short test that proves the screen and sound sources are present before an important session begins.
Quick answer
Record task-based modules with readable cursor guidance, narration, examples, and a visible completion state. Use GiliSoft Screen Recorder for Mac to keep the capture setup, audio and webcam sources, annotations, shortcuts, and long-session controls in one workspace.
Grant Only the macOS Permissions the Recording Needs
| Source | macOS setting | When it is needed |
|---|---|---|
| Screen and internal audio | Privacy & Security > Screen & System Audio Recording | Screen capture and supported Mac system sound |
| Microphone | Privacy & Security > Microphone | Narration, voice, or room audio |
| Camera | Privacy & Security > Camera | Presenter webcam or camera-only capture |
| Files and folders | Privacy & Security > Files & Folders | Saving into a protected Desktop, Documents, or other selected location |
After changing a permission, reopen the recorder when macOS requests it. Keep permissions disabled for sources the current recording does not use.
Build the Recording Around Learning
| Decision | What to prepare | Quality check |
|---|---|---|
| Objective | Observable learner outcome | Confirm before opening sensitive content. |
| Structure | Short modules, example, practice, and recap | Test the exact source and workflow. |
| Accessibility | Captions, transcript, contrast, and readable type | Make the important action easy to follow. |
| Privacy | Consent, student data, chat, and notifications | Verify the saved file in its real destination. |
Record training videos with GiliSoft Screen Recorder for Mac
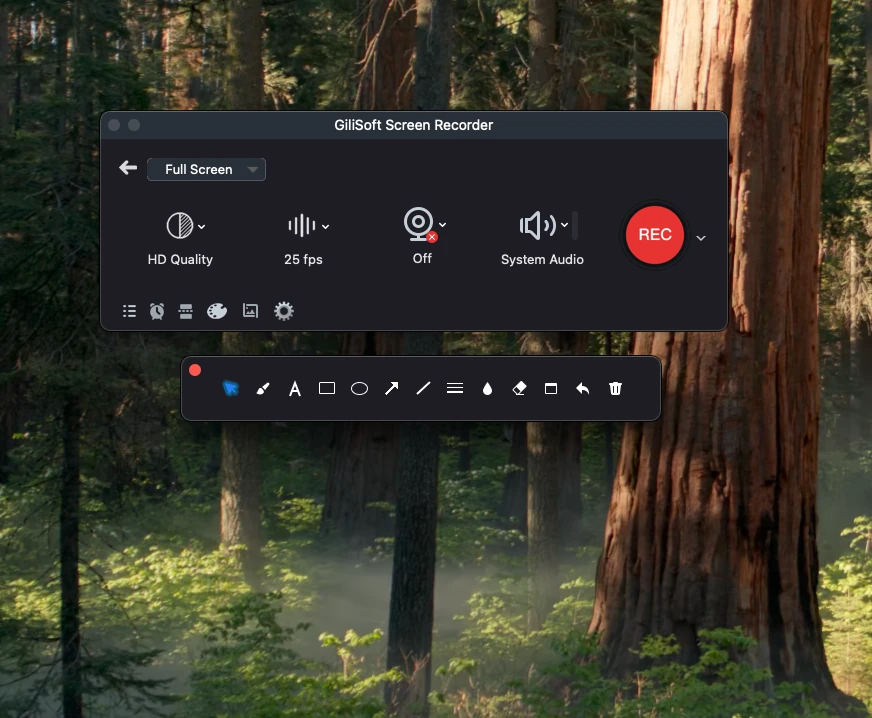
The screenshot below is a real Mac recorder interface matched to this workflow.
- Define one objective
State what the learner should be able to do.
- Prepare the lesson assets
Open only the required apps and sample files.
- Test sound and visibility
Check microphone, system audio, webcam, scaling, and cursor.
- Record in sections
Use annotation where it improves explanation, not as decoration.
- Validate with a learner
Confirm another person can follow the steps and reach the result.
Control Longer Mac Recordings
- Confirm available storage
Choose the output folder and leave enough free space for the expected duration and quality.
- Use keyboard shortcuts
Start, pause, resume, stop, or take a snapshot without repeatedly opening the recorder window.
- Set an auto-stop rule
End capture by time or file size when a session has a known limit.
- Use automatic splitting
Divide long webinars, lessons, meetings, or training sessions into manageable files.
- Keep the Mac awake and powered
Prevent sleep and connect power before a session that cannot be repeated.
Verify the Saved Recording Before Sharing
- Open every output file
Check the first file and every automatically split segment.
- Inspect the picture
Confirm the correct display or region, readable text, cursor visibility, and webcam position.
- Listen to every required source
Check internal audio, microphone, clipping, echo, noise, and audio-video synchronization.
- Review privacy
Look for notifications, email, account names, files, browser tabs, chat, passwords, and private URLs.
- Test the destination
Play the exact uploaded or shared file on the platform the audience will use.
Record Only What You Are Authorized to Capture
Get the permission required by the meeting, school, employer, client, platform, and applicable local law before recording people, calls, classes, webinars, or private material. Recording requirements vary.
Turn on a Mac Focus such as Do Not Disturb, use demonstration data, and review the final video for names, messages, account identifiers, internal URLs, credentials, and unrelated desktop content.
Record Training Videos on Mac FAQ
Can GiliSoft Screen Recorder for Mac record training videos?
Yes. Choose the full screen or a custom area, then enable internal audio, microphone, webcam, cursor effects, annotation, or long-session controls as the task requires.
Why is the screen or system audio unavailable?
Open System Settings > Privacy & Security > Screen & System Audio Recording and allow the recorder. Reopen the app if macOS asks you to do so.
Why is the microphone or camera unavailable?
In System Settings > Privacy & Security, enable the recorder under Microphone or Camera. Close another app that may already be using the selected device.
How do I prevent private notifications from appearing?
Turn on a Focus such as Do Not Disturb, close private apps and tabs, and record a selected region instead of the full display when possible.
What should I check after recording?
Open the saved file and verify capture area, readable text, system sound, narration, webcam framing, synchronization, duration, privacy, and every auto-split segment.