
What Can Image Enhancement Software Improve?
Image enhancement changes the visible presentation of a photo: its lightness, tonal range, color, local contrast, haze, and noise. The best result fixes a specific weakness without making skin, products, skies, shadows, or fine detail look artificial.
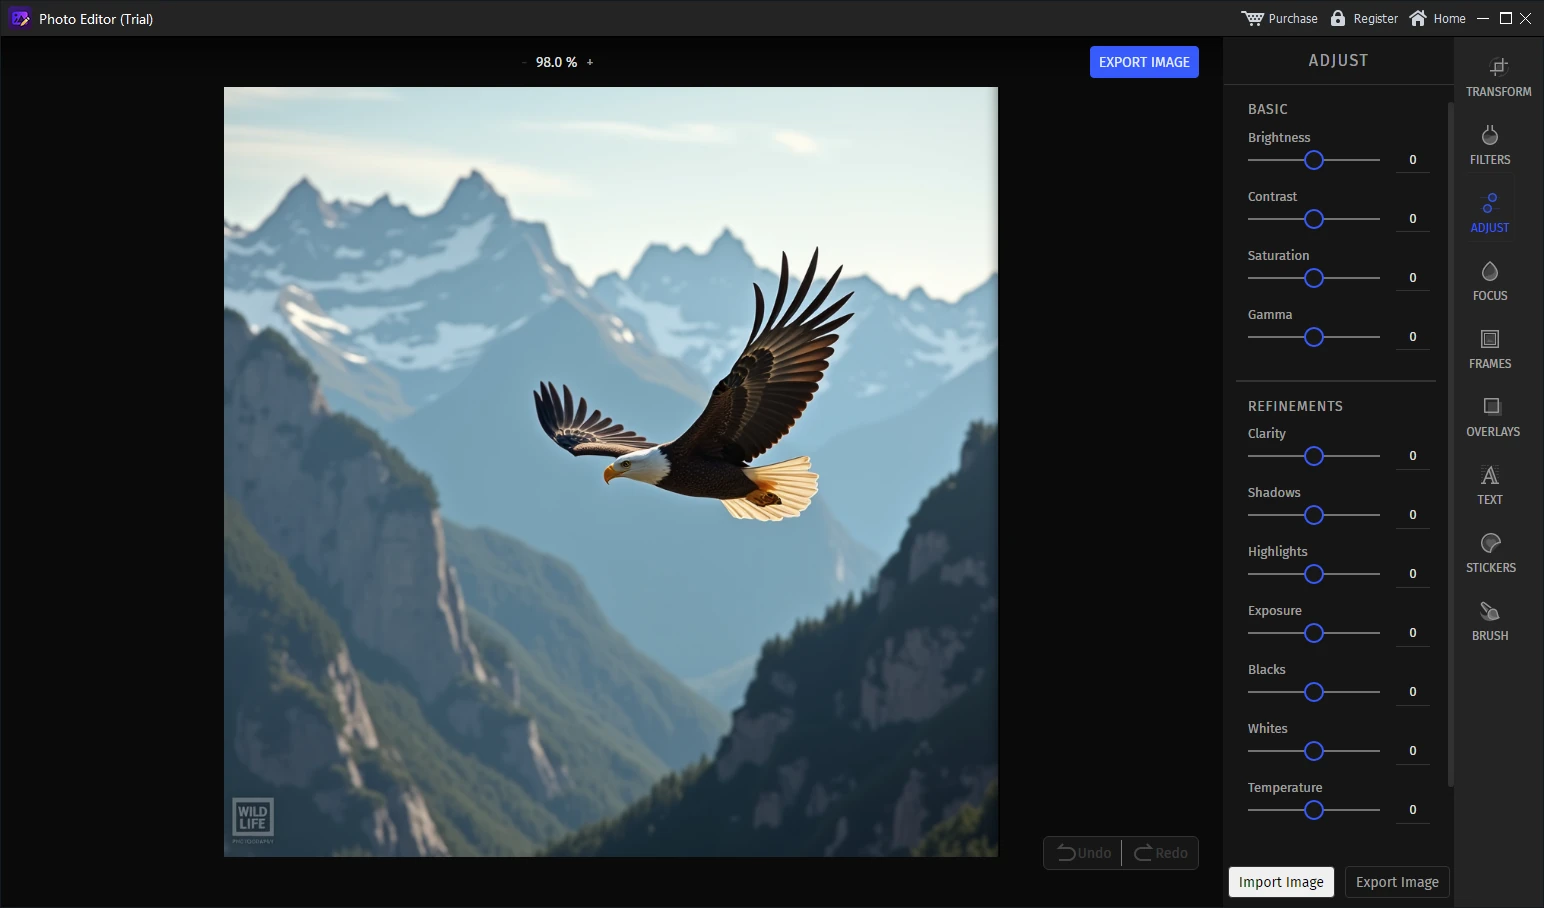
The Adjust panel visibly provides Brightness, Contrast, Saturation, Gamma, Clarity, Shadows, Highlights, Exposure, Blacks, Whites, and Temperature. These controls address different parts of the image, so changing every slider is not a useful workflow. Diagnose the problem, make the smallest relevant correction, and compare the result with the source.
Diagnose the Photo Before Applying an Effect
Start by naming the visible problem. This prevents automatic enhancement, saturation, clarity, and noise reduction from being stacked without a reason.
Weak or dull color
Try Color enhancement or a restrained Saturation adjustment. Check skin, product color, foliage, and logos against the original.
Photo is too dark
Try Low Light enhancement or adjust Exposure and Shadows. Expect noise in dark areas to become more visible when they are lifted.
Flat tonal range
Use Contrast, Whites, Blacks, Highlights, and Shadows to establish separation while retaining important bright and dark detail.
Hazy or low-clarity scene
Try Defogging or a modest Clarity adjustment. Heavy treatment can produce halos and unnatural contrast around buildings, mountains, and trees.
Visible grain or color speckles
Use Noise reduction after the major light correction. Inspect fine texture because strong reduction can smear hair, fabric, foliage, and text.
Unwanted warm or cool cast
Adjust Temperature while checking neutral objects, skin tone, white products, walls, paper, and known brand colors.
| Symptom | Start with | Inspect carefully |
|---|---|---|
| Underexposed but usable photo | Low Light enhancement or Exposure and Shadows | Noise, blocked shadows, skin tone, and bright signs or lamps |
| Washed-out highlights | Highlights and Whites | Clouds, white clothing, reflective products, paper, and specular light |
| Muted color | Color enhancement or Saturation | Skin, food, product color, logos, and already-saturated areas |
| Fog or atmospheric haze | Defogging or restrained Clarity | Halos, distant depth, sky gradients, and edge contrast |
| High-ISO grain | Noise reduction after tonal adjustment | Hair, fabric, leaves, fine text, and natural texture |
GiliSoft Image Editor Enhancement Tools
Color enhancement
Use the Photo enhancement workspace when an image looks visually weak or muted. Compare the result with the source rather than assuming stronger color is always better.
Low Light enhancement
Use it for a dark but recoverable photo. Review shadows and noise after enhancement, especially in high-ISO indoor or evening images.
Manual Adjust panel
Control brightness, contrast, saturation, gamma, clarity, shadows, highlights, exposure, blacks, whites, and temperature for a more deliberate correction.
Defogging
Improve contrast in a hazy-looking scene. Preserve realistic atmospheric depth and check for bright or dark outlines around the horizon.
Noise reduction
Reduce visible image noise after light and shadow corrections. Balance smoothness against the loss of genuine fine detail.
Export and comparison
Save a separate enhanced copy, reopen it, and compare full-resolution detail as well as the actual viewing size.
How to Enhance a Photo with GiliSoft Image Editor
- Protect the originalDuplicate the photo or work from a separate folder. Use the highest-quality source rather than a social-media download or screenshot when possible.
- Identify one primary problemDecide whether the first pass should address weak color, low light, tonal balance, haze, or noise.
- Choose the relevant workspaceOpen Color enhancement, Low Light enhancement, Adjust, Defogging, or Noise reduction according to the diagnosis.
- Apply a restrained first passUse Enhance or Generate in the dedicated workspace, or move only the manual controls needed for the problem.
- Compare before and afterCheck whether the edit reveals useful detail and improves readability without flattening texture or creating artificial color.
- Inspect at 100 percentReview noise, halos, skin, hair, fabric, foliage, product edges, text, highlights, shadows, and color transitions.
- Export a separate fileSave the enhanced result without overwriting the source, then reopen the exported file and check it at the intended delivery size.


Test enhancement on one representative photo
Download GiliSoft Image Editor and start with the most difficult image in the set. Approve color, light, texture, and noise before editing other photos.
Use Manual Tone and Color Controls in a Useful Order
Official Adobe guidance separates overall exposure, highlight and shadow recovery, white and black points, contrast, color, clarity, and detail. The exact mathematics differ between editors, but the same disciplined order prevents one adjustment from hiding the damage caused by another.
- Set overall lightnessUse Exposure or Brightness to place the main subject in a usable range. Do not force a severely dark photo into daylight brightness.
- Protect important highlightsReview Highlights and Whites where clouds, paper, lamps, screens, reflective packaging, or pale clothing approach pure white.
- Open useful shadowsUse Shadows for details the viewer needs. Watch for gray blacks, color shifts, and amplified noise.
- Establish black and white pointsUse Blacks and Whites to define the tonal endpoints without erasing important texture.
- Refine contrast and gammaAdjust Contrast for separation and Gamma when midtone behavior needs correction. Recheck the full tonal range afterward.
- Correct colorUse Temperature and Saturation last enough that the photo's light and contrast are already understandable.
- Add clarity carefullyClarity can increase local contrast and apparent definition, but too much creates halos, rough skin, and brittle texture.
Defogging and Noise Reduction Solve Different Problems
Haze lowers contrast across distance and edges. Noise creates grainy luminance variation or colored speckles, especially in high-ISO and brightened low-light photos. Treating one as the other can make the image worse.
| Tool | Use it for | Do not mistake it for | Typical overuse sign |
|---|---|---|---|
| Defogging | Low-contrast haze or fog that weakens scene definition | Missed focus, motion blur, or low resolution | Halos, crushed shadows, harsh sky, and lost atmospheric depth |
| Noise reduction | Grain or color speckles visible after capture or shadow recovery | JPEG blocks, blur, dust, or missing subject detail | Waxy skin, smeared hair, flat fabric, and disappearing foliage |
| Clarity | Restrained local-contrast improvement | True optical sharpness or resolution recovery | Bright/dark edge outlines and unnatural texture |

How to Judge Whether the Enhanced Photo Is Better
Check these common failure signs
- Clipped highlights: white areas lose texture and become flat patches.
- Blocked shadows: dark areas collapse into solid black without useful detail.
- Oversaturation: skin turns orange or red, foliage becomes fluorescent, and brand colors drift.
- Noise amplification: lifted shadows reveal grain, color speckles, or compression blocks.
- Over-smoothing: noise reduction removes hair, fabric, pores, leaves, and small text.
- Halos: strong clarity or defogging creates bright and dark outlines around objects.
- False sharpness: stronger edges appear, but genuine source detail has not increased.
What Image Enhancement Cannot Reliably Fix
A photo enhancer cannot reliably restore detail that is absent because of severe motion blur, missed focus, heavy downscaling, extreme JPEG damage, blocked shadows, or clipped highlights. Automatic enhancement may produce a more attractive impression, but it should not be presented as recovery of factual detail.
For identification, evidence, medical, inspection, archival, or product-accuracy work, retain the original and document the enhanced copy. Do not use color, exposure, noise reduction, or generated detail to hide defects or alter information the viewer is expected to judge.
Research Sources
The workflow combines confirmed GiliSoft controls with official guidance on tone, color, detail, and noise.
- Adobe Lightroom photo editing guide - exposure, highlights, shadows, whites, blacks, saturation, clarity, and clipping checks.
- Adobe: Adjust lighting - practical roles of exposure, contrast, highlights, shadows, whites, and blacks.
- Adobe: Adjust image details - sharpening and luminance/color-noise tradeoffs.
- Adobe Lightroom Classic: Sharpening and noise reduction - 100 percent inspection and detail preservation.
- Adobe Camera Raw Enhance - denoising low-light and high-ISO images while reviewing detail.
Image Enhancement Software FAQ
What enhancement tools are included in GiliSoft Image Editor?
The confirmed tools include Color enhancement, Low Light enhancement, manual brightness and tone controls, Defogging, and Noise reduction.
Can image enhancement recover detail that was never captured?
No. Enhancement can improve visible tone, color, contrast, haze, and noise, but it cannot reliably recreate clipped highlights, blocked shadows, missed focus, or absent source detail.
What is the difference between brightness and exposure?
Both affect image lightness, but exposure is normally used for the broad overall level while brightness can alter perceived lightness differently depending on the editor. Judge the actual preview and avoid clipping.
Why does noise appear after brightening a dark photo?
Dark areas often contain weak signal and visible noise. Raising exposure or shadows makes that noise easier to see, so noise reduction may be needed after tonal correction.
Should the original photo be overwritten?
No. Keep the original and export the enhanced version as a separate file.


