Follow task-based instructions to block USB storage and file copying, allow approved devices, control phones and USB network adapters, and review access activity.
Set USB access rulesAllow trusted devicesControl transfer channelsReview activity logs
Choose the USB policy that matches the job
Block read and write
Use this when unknown removable storage must not be opened or used for file transfer.
Block write only
Allow users to read approved material while preventing files from being copied from the PC to USB storage.
Whitelist trusted devices
Keep approved company USB drives working while unknown or personal removable devices remain restricted.
For most company deployments, combine a default block policy with a trusted-device whitelist instead of manually opening USB access whenever an approved drive is needed.
Set up USB Lock and apply the core policy
Install and create the administrator password
Install GiliSoft USB Lock with administrator permission.
Create the master password used to change device-control policies.
Add a recovery email before deploying restrictions.
Confirm the protection service is running.
Prepare a safe first test
Keep one approved USB drive available for whitelist testing.
Close files currently open from removable media.
Start with one test computer before repeating the policy elsewhere.
Record the administrator and recovery information securely.
1. Configure USB storage and transfer rules
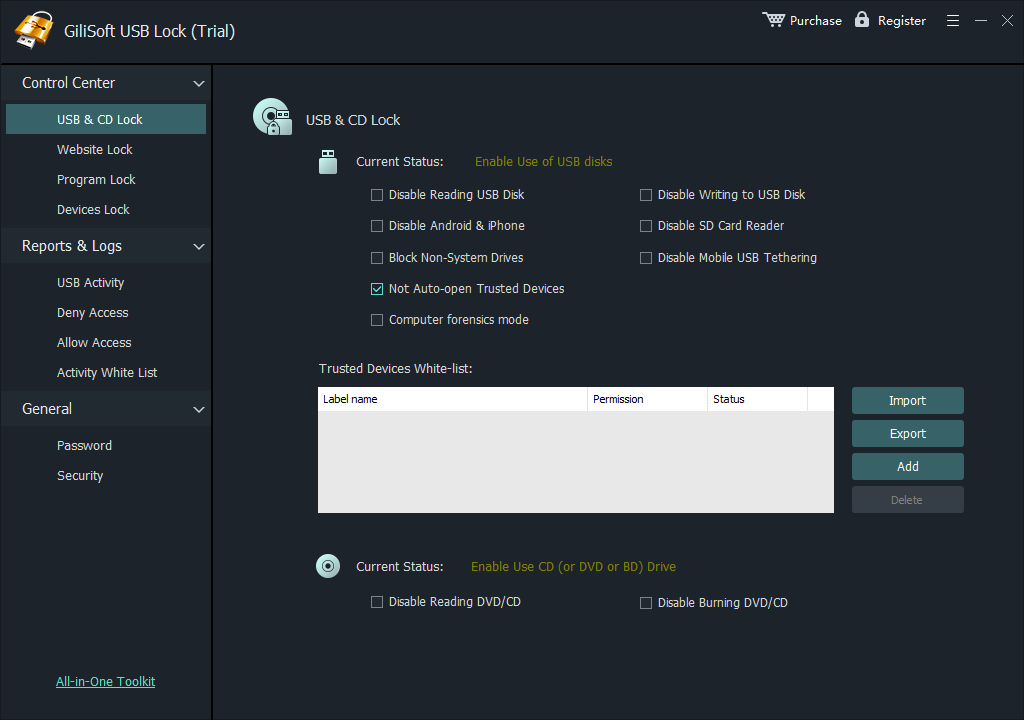
Use USB & CD Lock to control the main removable-media channels on the Windows PC.
1Open USB Lock and choose the USB and CD control section.
2Disable USB writing when users may read approved drives but must not copy company files out.
3Disable USB reading when unknown storage must not open on the PC.
4Apply the required SD card and phone data-transfer restrictions.
2. Add approved USB drives to the whitelist
Whitelist known company devices so they remain available while the default restriction continues to block unknown storage.
1Insert an approved USB drive.
2Open the trusted-device list and click Add.
3Repeat the process for every approved company drive.
4Export the completed whitelist and import it on other managed computers when needed.
Disable USB network adapters and allow approved devices
3. Enable USB Ethernet Lock
Use the USB Ethernet Lock page when unapproved USB Wi-Fi or Ethernet adapters must not provide another network path on the Windows PC.
1Open Control Center and select USB Ethernet Lock.
2Connect each USB network adapter that should remain approved before enforcing the block.
3Add the approved adapter to the USB Ethernet Whitelist.
4Select Disable USB Ethernet, save the policy, and test both an approved and an unknown adapter.
The USB Ethernet whitelist is separate from the trusted USB storage list. Register the correct physical network adapter shown by Windows before enabling the restriction.
Select the adapter by device identity
Click Add, choose the connected USB Ethernet device from the list, and confirm it. The policy screen records the adapter name and USB Ethernet ID so the selected device can remain available.
1Confirm the adapter name matches the approved hardware.
2Click OK to add it to the whitelist.
3Repeat for each approved USB network adapter.
4Remove obsolete entries when an adapter is retired or replaced.
Control phones, SD cards, and CD/DVD media
Apply only the device controls this PC needs
Extend the removable-media policy beyond flash drives when phones, cards, or optical media can also move data.
1Restrict SD card and card-reader access where removable camera media is not approved.
2Block Android or iPhone data transfer while leaving ordinary charging available where supported.
3Disable CD/DVD reading or disc burning according to the workstation policy.
4Save the rules, reconnect the device, and confirm the result in the activity log.
CD/DVD reading and burning
Control whether users can read optical media or write files to recordable discs. Apply only the restrictions required for that workstation.
Other endpoint ports
Printer, Bluetooth, modem, COM/LPT, infrared, and 1394 controls remain available when the same PC policy must cover more than removable storage.
Review activity and protect administrator settings
Review allowed, blocked, and whitelist events
Use the logs to understand when a device was connected and how the current policy handled it.
1Open the activity or monitoring section.
2Filter for denied USB access, allowed trusted devices, and policy changes.
3Record the time, device, user context, and result when an event needs investigation.
4Export or retain logs according to the organization's support process.
Configure self-protection and alarm notifications
Protect the policy from casual changes and make repeated unauthorized access attempts easier to notice.
1Open the security or self-protection settings.
2Enable the appropriate password and policy protection options.
3Configure alarm email notifications where administrators need them.
4Test the alert process without exposing the administrator password.
Recover or change the administrator password
Set the recovery email before the password is lost, then use the supported recovery process when administrator access is needed.
1Confirm a valid recovery email is configured.
2Use the password recovery option from the USB Lock login interface.
3Complete the recovery steps sent to the authorized email address.
4Create a new administrator password and store it securely.
Other controls available in USB Lock
Website and network restrictions
Block selected websites and manage IP or network-adapter changes when network access is part of the workstation policy.
Program blocking
Restrict selected programs from running on shared or managed Windows PCs when application use also needs control.
Allow approved encrypted USB drives
Add each approved encrypted company drive to the whitelist so it remains usable while unknown removable storage stays blocked.
Deploy the policy to more PCs
Test the settings on one computer, export the trusted-device list, then import it on other managed PCs. Large deployments can contact GiliSoft for policy customization.
USB Lock troubleshooting
An approved USB drive is still blocked
Confirm the correct physical device was added to the whitelist.
Reconnect the drive after the policy is saved.
Check whether read access, write access, or both are restricted.
Review the activity log for the exact deny event.
A phone charges but cannot transfer files
This can be expected when phone data access is blocked.
Check the Android/iPhone transfer policy separately from charging.
Reconnect the phone after changing the rule.
Review the log to confirm which policy was applied.
An imported whitelist does not work
Confirm the list was exported after all devices were added.
Import it with administrator permission.
Save or apply the policy before testing.
Compare the imported device identity with the connected USB drive.
The administrator password is unavailable
Use the configured recovery email process.
Check that the protection service is running normally.
Do not uninstall or alter policy files as a recovery shortcut.
Contact GiliSoft support when authorized recovery cannot be completed.
USB Lock FAQ
Can I block copying files to USB without blocking reading?
Yes. Disable USB writing while leaving the permitted read behavior available.
Can approved company USB drives remain usable?
Yes. Add them to the trusted-device whitelist while unknown removable devices stay restricted.
Can USB Lock disable USB network adapters?
Yes. Enable Disable USB Ethernet to restrict USB network adapters detected by Windows.
Can an approved USB Ethernet adapter remain available?
Yes. Add the connected adapter to the separate USB Ethernet whitelist before applying the block policy.
Can I export and import the USB storage whitelist?
Yes. Build the trusted storage-device list on one PC, export it, and import it on other managed computers.
Can USB Lock control phone data transfer?
Yes. Android and iPhone data access can be restricted separately from ordinary USB storage policy.
Can I review blocked USB attempts?
Yes. Activity logs help administrators review denied access, allowed trusted devices, and policy events.
Can CD/DVD reading and burning be controlled?
Yes. Optical-media reading and disc-burning restrictions can be applied according to the workstation policy.
Control removable devices without blocking approved work
Apply USB read and write rules, keep trusted company drives available, restrict phone and media channels, and review device activity from one Windows policy tool.